Scope
This article discusses several key issues related to Implicit FrontEnd that customers should consider prior to deploying FrontEnd in their production environments. It applies to Implicit FrontEnd for SugarCRM and SuiteCRM on Outlook for Windows.
Network-based Deployment
Implicit provides two different methods of installing FrontEnd.
- Interactive installer – This is an executable (EXE) that you run on the desktop on which you want to install FrontEnd. The installer checks the list of prerequisites that are required for FrontEnd to run. If any are missing or needs to be updated, it prompts you to download it from Microsoft site and install it prior to installing the FrontEnd add-in.
- Network-based Installation – When IT administrators need to deploy FrontEnd on many desktops, they typically prefer to push the installation package silently over the network using software deployment tools such as Active Directory Group Policy. This may also be required in organizations where users do not have permissions to install software on their PCs. The process involves two steps:
- Installing Microsoft components that are prerequisites for the Outlook add-in.
- Installing FrontEnd Outlook add-in.
Note: The prerequisites need to be installed prior to installing FrontEnd Outlook add-in, otherwise the add-in will not work. If you need to install the software silently over the network, please contact us and we will provide the installation package (MSI) and an administrator guide.
Centralized Configuration
Implicit provides a mechanism that allows CRM administrators to create a FrontEnd configuration for their users. FrontEnd configuration includes the following settings:
- Tethered vs. Untethered mode – How should contacts be synced with CRM.
- Sync Configuration – What CRM modules and which records to sync.
- Auto-Email Archiving Rules – Corporate level rules vs. individual rules
- Side Panel – which modules/fields to display on side-panel and order of appearance.
- Opportunity Tracking settings.
To simplify the deployment process, shorten the training and learning curve and make it easier for their users to be up and running as quickly as possible, we strongly recommend for CRM admins to use this mechanism to create and publish configurations for their users.
If all your users will be using the same configuration, you can simply publish the configuration to the global group, or you can create a new user group called “Implicit FrontEnd Users” which will include all the users who will be using FrontEnd.
Alternatively, if your users are divided into groups that require different configurations, you can create and publish a configuration for each group separately. When users are members of different groups and there are different choose from, FrontEnd will display a list of the groups and allow users to choose which configuration to use.
For more information see Team-based Configuration.
Tethered Vs. Non-Tethered Mode
One of the decisions you’ll need to make when going through the initial configuring of the software is whether to use Tethered or Non-Tethered mode for contact synchronization. This mode determines how contacts are synced from CRM to Outlook and how related records are accessed from within Outlook.
In Tethered Mode, contacts are not synced from CRM to Outlook during the initial sync phase. When FrontEnd requires information about a contact or any of its related records, it will perform a real-time search on CRM to retrieve the contact information and all of its relationships.
In Non-Tethered Mode, contacts will be synced from CRM to Outlook depending on which contacts were marked on CRM for synchronization with Outlook. In this mode, when FrontEnd requires information about a contact, it will search in Outlook and present the information directly from Outlook. In this mode, contacts are essentially cached on the desktop.
In Sync on Demand mode, contacts will not be synced ahead of time, but when FrontEnd searched for the contact for the first time and finds it on the CRM, it will sync it at that time so next time the information will be immediately available.
Each mode has pros and cons to consider but the decision is primarily driven by the amount of contacts that users may need to sync to their Outlook. It’s important to understand that there are two independent synchronization processes running at the same time. Outlook synchronization
with the Exchange server and Outlook synchronization with CRM. Therefore, its highly recommended to keep the number of contacts to a reasonable amount and not exceed 2000 contacts in your Outlook contact folder.
- If you have a large number of contacts in CRM that you have marked in the CRM to sync to your Outlook – choose Tethered Mode. You may sacrifice performance by having to search for contacts on the server in real-time, but you will certainly gain performance by keeping the amount of contact to a reasonable number.
- If you don’t have a large number of contacts to sync, choose Non-Tethered Mode. FrontEnd will sync theses contacts during the initial sync phase but once that’s done, it will only sync new/modified contacts which will not have any significant impact on performance. Having synced these contacts to Outlook will eliminate the need to constantly search for them on CRM and the email side panel will be able to display the information instantly.
Sync by ‘Assigned to’ or ‘Assigned to Team/Group’
For some CRM modules, you have the option to sync either contacts that are assign to you personally or if you are working as part of a team and would like to share the information with your team, select to sync records that are assigned to your team (or security group). Sharing information with your team in this context means any modifications (or new records) that are made by any of the members of your team will be automatically propagated to their Outlook and vice versa.
The modules that allow you to sync by team include:
- Accounts
- Opportunities
- Leads
- Tasks
- Notes
- And others such as: Quotes, Contracts, etc.
For example:

Synchronizing Outlook Calendar
Most users, do all their meetings scheduling in Outlook and want these meetings to be stored in the CRM and associated with their corresponding contacts’ or leads’ records.
If you are not planning to schedule or modify meetings in the CRM, we recommend that you only enable the Outlook to CRM synchronization direction for meetings and calls.
Synchronizing Records Via Search
If you are looking for some CRM records and unable to find them in FrontEnd, these records have not been synced because they are outside the sync filters. It could be that these records were not assigned to you or your team/ Security group or they could have been created or modified prior to the timeframe you configured for sync. In those scenarios, you can still force synchronization of record by following these steps: Using the Implicit FrontEnd search tool, select the type of module, set it to search in CRM and set the search criteria. For example, searching for contact in CRM that were not synced to Outlook:
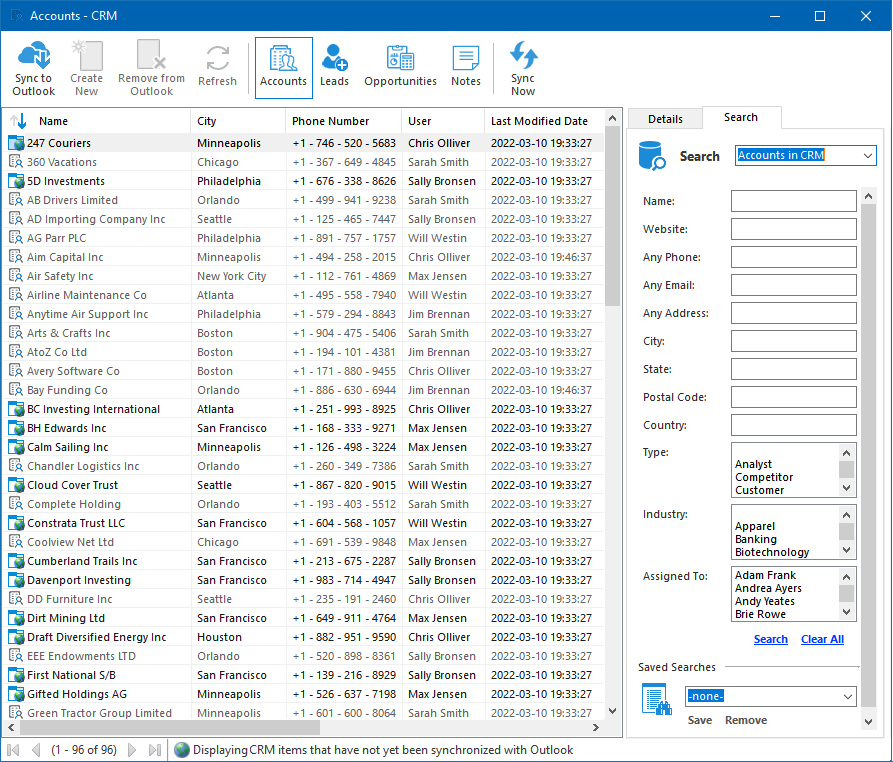
You’ll notice that when you search, the items that have already been synced to Outlook are grayed out and their icon is a regular lead icon while the items that have not been synced yet, have normal font with a globe icon.
Simply select the records that you’d like to sync and click “Sync to Outlook”.
Email Archiving Rules
When creating rules for auto-email archiving – If your intention is to archive all emails that are received from CRM contacts or sent to CRM contacts, create the following 2 rules.
For incoming emails:
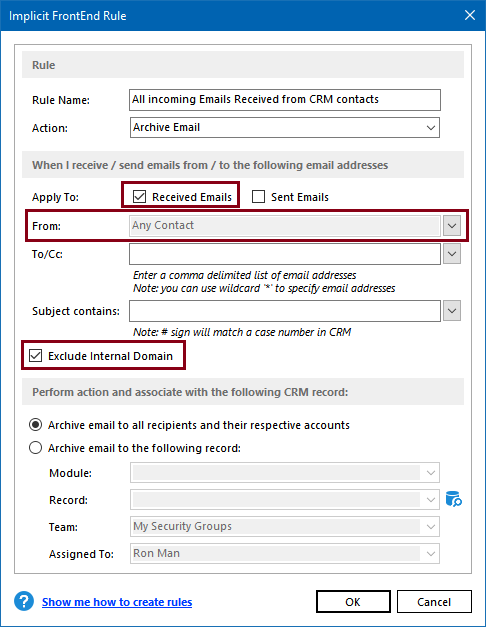
Notice the selection of ‘Any Contacts’ in the ‘From’ field. If you have your users defined as CRM contacts, make sure to exclude internal domain.
For Outgoing emails:
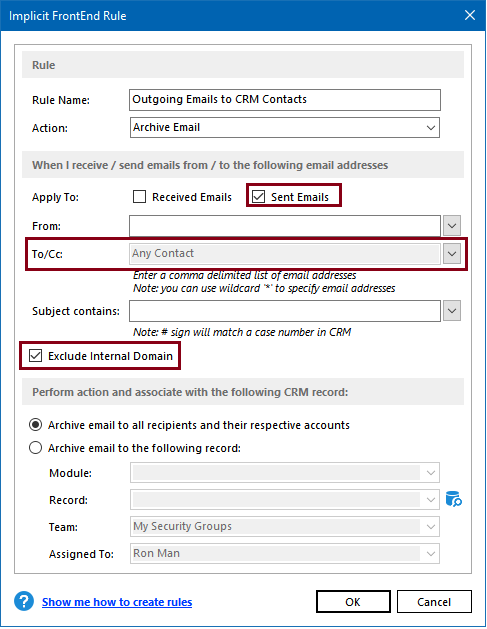
Notice the selection of ‘Any Contacts’ in the ‘To/CC field. If you have your users defined as CRM contacts, make sure to exclude internal domain.
Note: If you’d like to enforce this policy for all users, we recommend that your CRM admin creates these two rules prior to publishing the configuration to other user.
Email Archiving to any CRM / Custom Record
If you would like to manually archive an email and select a record that may not be directly related to the contact or its account, you can do so by going to the advanced email archiving tool and select the option to archive to any record. For example:
Note: in the “Related To” field, you may select any type of record including custom records as long as there is a relationship defined in the CRM between the custom module and the email module.
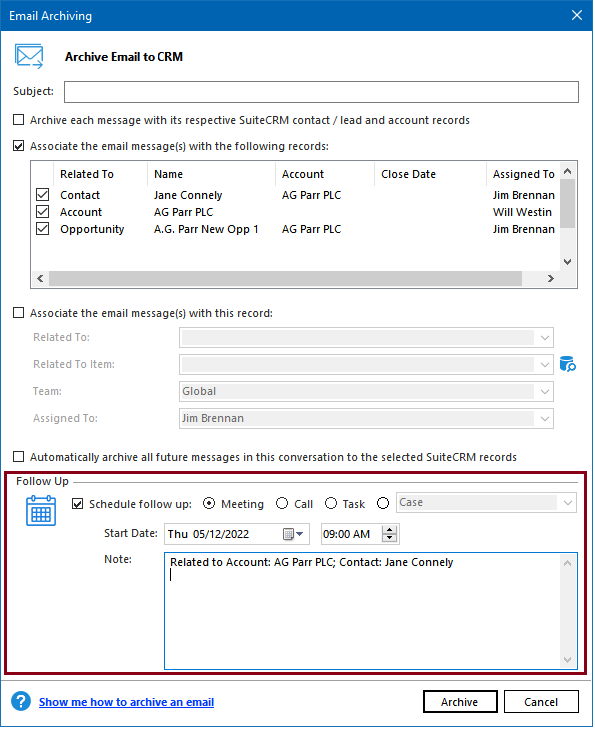
Scheduling a follow up Meeting/Call/Task upon archiving an email
When you’re archiving an email from/to a customer and wish to also schedule a meeting or a call at the same time, you can do so via the Advanced Email Archiving dialog as shown below:
Ensuring Personal Items are not Synced
To ensure that no personal items such as contacts or appointments are synced unintentionally to the CRM, FrontEnd follows this process:
- During the initial sync cycle CRM data is synced to Outlook
- Post initial sync, only items that are explicitly marked by users as CRM data will be synced to CRM. Personal items such as personal contacts or appointments / meetings in Outlook are not touched unless they are marked for synchronization.
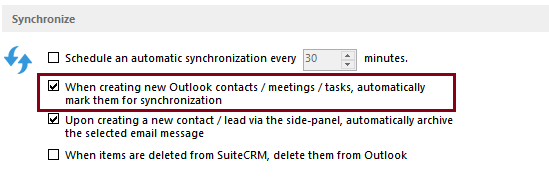
Marking items for synchronization in Outlook is done by checking “Sync to CRM” checkbox at the bottom of each Outlook form (contacts / calendar / tasks) as show below:

Notes:
- Notice that selecting this checkbox, also sets the green Implicit FrontEnd category and deselecting it removes the category.
- By default, when you create a new item in Outlook, this checkbox will be selected. That means any new contact that you create in your Outlook contact folder or any new meeting that is created in your calendar (whether you create it yourself or when you accept a meeting invite) will be marked for synchronization. If you’d like to change this behavior, such that items will not be marked by default and you’ll have to mark them yourself for them to get synced, you can do so by unchecking this checkbox on the ‘General’ options page: