Before Installing Implicit FrontEnd
There are few items to consider before installing Implicit FrontEnd on your desktop. Please discuss them with your CRM admin so that you would know what options to select during the configuration process.
Implicit Server-side Extension Module
Implicit provides a SugarCRM server-side extension custom module that some of the CRM productivity tools use. For example: the collaboration and approval tools use it to generate a collaboration/approval log on the CRM as well as on the client side. If your CRM admin has already installed the extension module, you will be notified by the configuration page that it has detected the extension module and that you will be able to use all CRM productivity tools in full client-server mode.
If your admin has not yet installed the extension module, you will be notified that FrontEnd is unable to detect the extension module and will work in client-only mode.
Note:
It’s not required to install the Implicit extension module prior to installing the FrontEnd client. You will still be able to use the CRM productivity tools in a client-only mode and exercise all functionality except the logs will created on the client side only. For more information see Configuring CRM Productivity Tools.
Centralized Configuration
FrontEnd allows CRM administrators to create different configurations for their users and publish them to different user teams (Security groups). Find out if your admin has already created a configuration for you and if so, which team should you select. If your admin has created a configuration for you, you will be able to skip the configuration process and simply apply the published configuration. For more information see Team-based Configuration.
Contacts Synchronization
If you are planning to sync contacts from the CRM to your Outlook, please bear in mind that Implicit FrontEnd will sync those contacts that you mark in your SugarCRM instance as “Sync to Mail Client”. If you have not yet marked the contacts on the CRM, please do so before installing FrontEnd and going through the initial sync cycle. It is easy to do by selecting the set of contacts that you’d like to synchronize and using “Mass Update” to mark those contacts for synchronization. Be aware that this contact property selection is per-user so when you mark a contact for synchronization, it will apply to you only and will not affect any other CRM user. If you can’t find “Sync to Mail Client” in your contact form, ask your CRM admin to add it through Studio > Contacts > Layout > Record/List View.
License Key
When you install FrontEnd and launch Outlook, you will be prompted to enter your license key. If your license key was sent to you in an email, make sure to get the key from your Outlook before you start the installation.
Installing Implicit FrontEnd
To install Implicit FrontEnd simply click the link you received to download and run the executable installer. The installer is an interactive wizard-like installer. It will first look for the prerequisites Microsoft software components installed on your desktop, and if any are missing or require an update, it will prompt you to download them from Microsoft site and accept the End User license Agreement (EULA). Once the prerequisites are installed, it will launch and run the Implicit FrontEnd Outlook add-in installation. This process is described in detail in the Installation Guide section of your user guide.
First Launch of Outlook after Installation
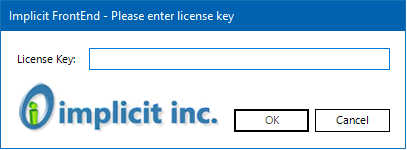
Upon the first launch of Outlook after installation, you will be prompted to enter the license key:
Followed by FrontEnd login dialog:
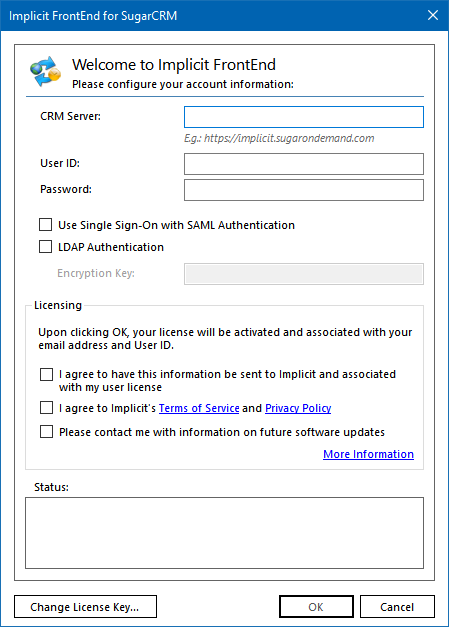
Enter the following information:
Server URL – Make sure to specify https:// followed by the same URL that you enter in the browser to access the CRM login page.
User ID / Password – This is your CRM user ID and password.
Note: If your organization uses SAML Single Sign On, please refer to SAML section in your user guide.
Make sure to check at least the first two mandatory checkboxes, indicating that you agree to have your email address and CRM user ID associated with your license and that you accept Implicit’s Terms of service and Privacy Policy. Click OK to start.
FrontEnd will login on your behalf to the CRM and retrieve the necessary CRM configuration information. Upon completion, it will prompt you to configure FrontEnd.
Initial configuration
If your CRM admin has already created a configuration and published it to any of your teams, you will be prompted to select it. In this case you won’t have to go through the configuration steps yourself. FrontEnd will automatically load the configuration from the server and apply it to your desktop.
If no configuration has been created by your admin, you will be promoted to configure the system yourself.
Note:
There are few settings that need to be configured prior to running the initial sync cycle. These settings only take effect during the initial sync cycle and you will not be able to change them later, unless you select Reset Configuration. All other settings can be changed at any time. In the following sections we will point out which settings you must configure during the initial configuration.
Configuring CRM Productivity Tools
The first configuration page is the CRM Productivity Tools. You can configure these settings at any time. The only section that is important to understand at this step, is the “FrontEnd Extension Package”. This is the CRM server-side Implicit extension module. If the module is not detected on the CRM, FrontEnd will display a message in red font, notifying you that the extension module was not detected on the CRM and that you will be limited to using the CRM productivity tools in client-only mode.
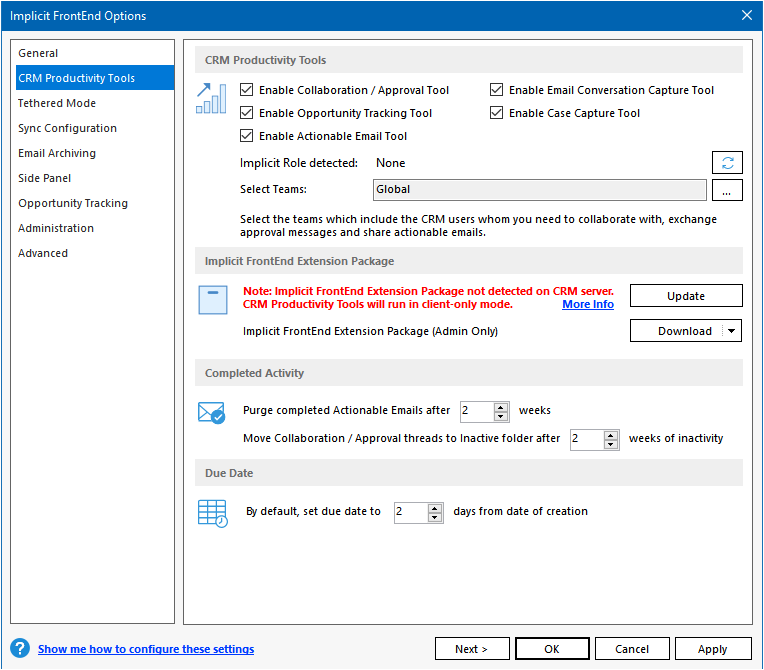
If your admin has already installed the extension module, FrontEnd will display the following message:

As mentioned in the Before Installing Implicit FrontEnd section above, it’s not required or critical to have the Implicit extension module installed before you can install or activate your copy of FrontEnd. You are still able to use all functionality in client-only mode. For more information see Implicit Server-side Extension Module
Configuring Tethered Vs. Non-Tethered mode
The next configuration page prompts you to select the mode of contact synchronization between the CRM and your Outlook:
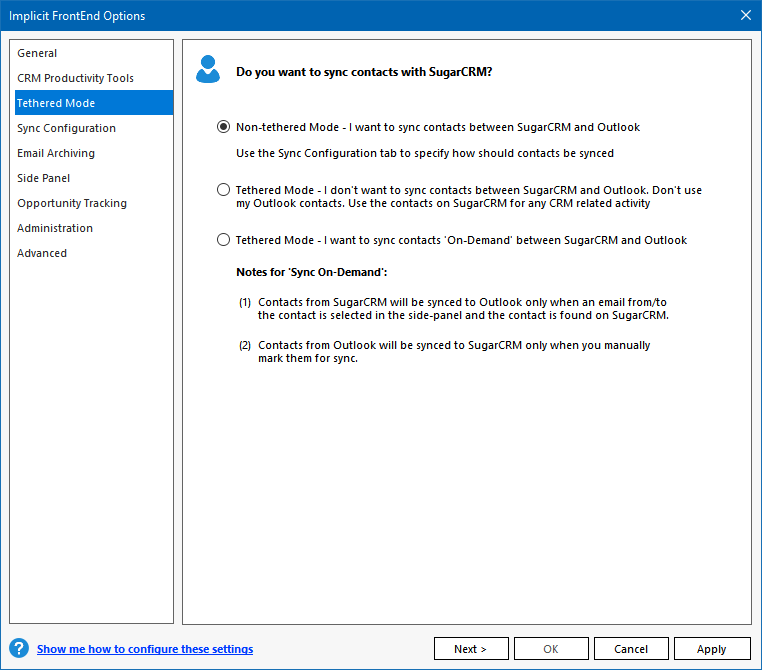
You have three options:
- Non-Tethered Mode – Sync contacts and all related information on your desktop (particularly relationships between contact and all other CRM records). If you don’t have more than about 2000 contacts, this is the mode we recommend as it provides a significant performance improvement since the data is synced and cached on the desktop which eliminates the need to retrieve data from CRM every time you receive or send email to this contact.
- Tethered Mode – Do not sync contacts. Instead, retrieve the data from the CRM in real-time.
- Sync on Demand – Don’t pre-sync contacts from CRM to Outlook, but once you access a contact on the CRM, sync the contact’s and any related information at that time. So, the information is cached upon the first time that it is retrieved from the CRM server. This is the mode we recommend if you have more than 2000 contacts.
Note:
You must make this selection at the initial configuration time since you won’t be able to change it later unless you select Reset Configuration.
Sync Configuration
In the Sync configuration page, you are prompted to configure synchronization for the different CRM modules. Simply click on each module and configure it.
The following modules are selected for synchronization by default:
- Contacts
- Accounts
- Opportunities
- Cases
- Leads
- Meetings / Calls
- Tasks
- Notes
All other modules are not selected by default, and you need to select and configure them if you are planning to sync them.
Note:
Cases module is selected by default, but most sales organizations do not need cases. If you’re not using cases, make sure to deselect it.
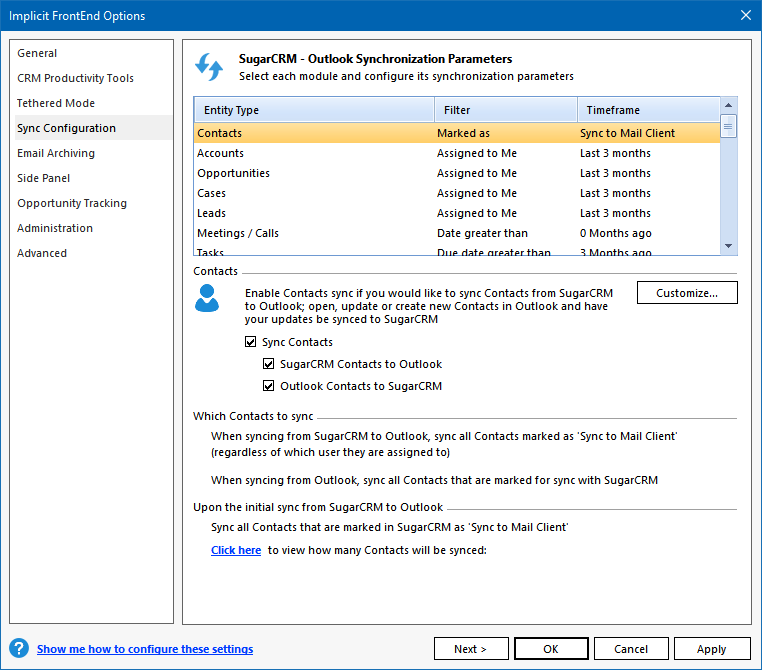
Contacts
If you’ve selected to sync contacts in the “Tethered Mode” page, contacts sync will be enabled and you can choose the direction: CRM to Outlook, Outlook to CRM or both. The configuration page reminds you that only contact that are marked for synchronization on the CRM will be synced. See Contacts Synchronization under the “Before you Install Implicit FrontEnd” section above.
To find out how many contacts are marked for sync on the CRM click on the ‘Click here’ link.
Accounts
You can select to sync accounts and the direction of the synchronization.
Next, you have the option to select to sync accounts that are assigned to you personally or if you share accounts with your sales team, select the “Assigned to Teams” option and click the ‘…’ button to select the team. You may select multiple teams.
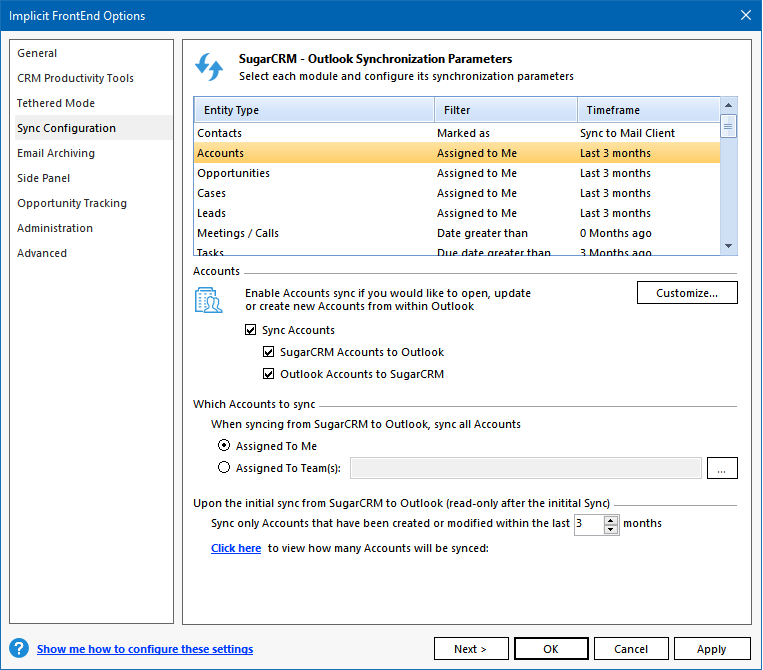
You can also limit the accounts sync by timeframe to ensure that you are only syncing fresh data. To find out how many accounts will be synced, click on the ‘Click here’ link.
Opportunities, Leads, Tasks and Notes
These configuration pages are exactly the same as accounts.
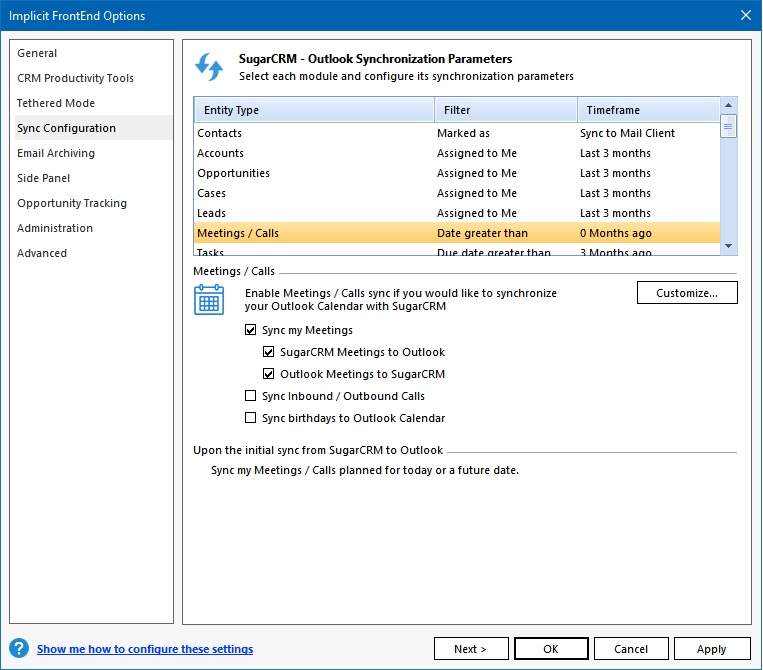
Meetings / Calls
You can select to sync meetings and the direction of the synchronization. You can also select to sync CRM calls with Outlook. FrontEnd will sync only future (and today’s) meetings/calls.
Email Archiving
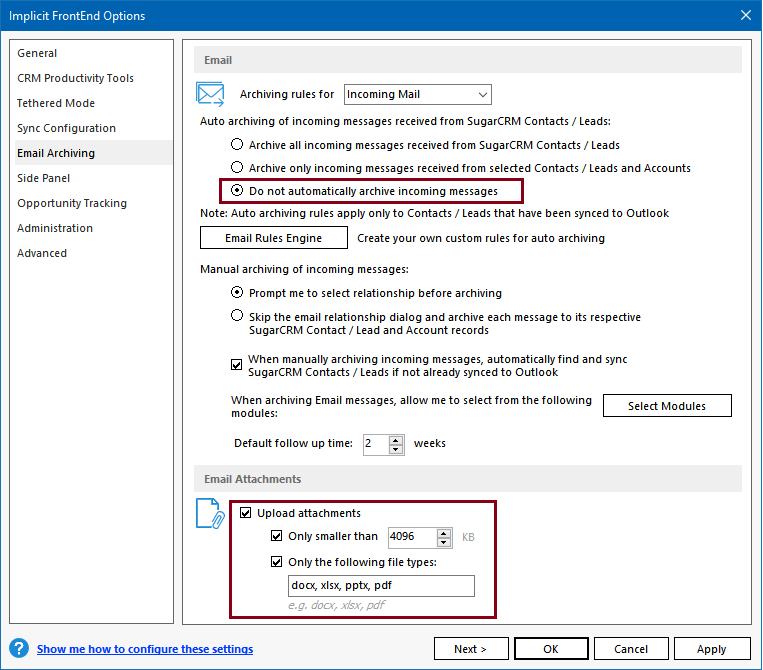
The top part of the email archiving configuration page is provided for backward compatibility purposes. We recommend that you disable it and use the rules engine to automatically archive incoming and outgoing emails.
To disable auto archiving here, select “Incoming Emails” in the drop-down and choose the third radio button “Do not automatically archive incoming emails”. Them repeat the process for outgoing emails.
Although you can configure the rules engine at this point, we recommend that you wait with creating rules until the initial sync is completed and the system is active. To view our recommendations regarding creating auto-archiving rules see “Best Practices – Creating Auto Email Archiving Rules”
The last section you need to configure is how to upload attachments. You can select or deselect attachments and limit them by size and by type. For more information about this configuration page see Configuring Email Archiving Tool
Side Panel
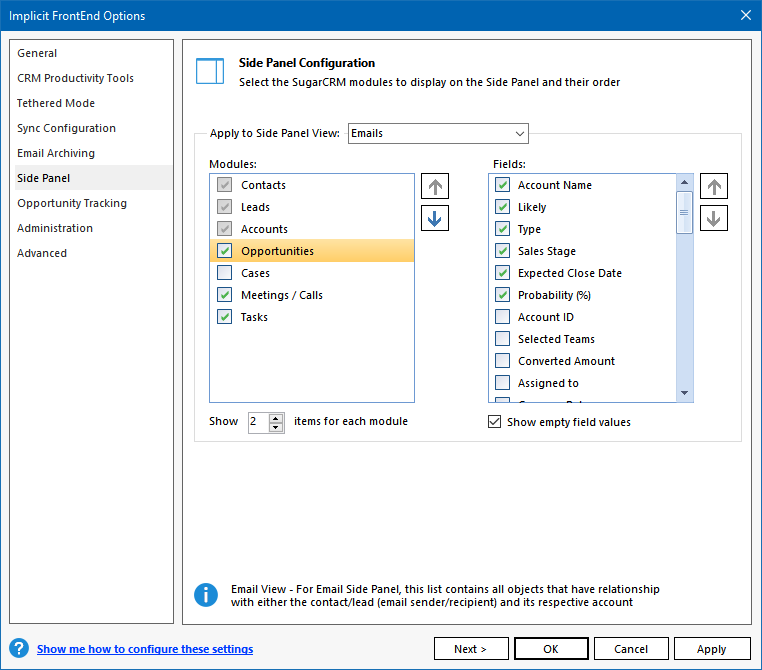
Configuring the side panel involves selecting the modules that should be displayed on the side panel and their order of appearance. Note that you can only select from the list of modules that you chose to sync.
When you select a module, you can also configure which fields are shown on the side-panel when the record is displayed.
By default, only the two most recent records for each module are displayed but you can change it if you need to.
Other Configuration Pages
All other configuration pages are not required at this point. You can configure them after FrontEnd is up and running.
Initial Sync Cycle
Once you’ve completed the Sync Configuration page, you are ready for the Initial sync cycle.
During the initial sync cycle, FrontEnd syncs from CRM to Outlook only. It uses the filters that you have configured for each of the modules you selected in the sync configuration page to retrieve these records from the CRM and sync them to Outlook.
You will be prompted to start synchronization:
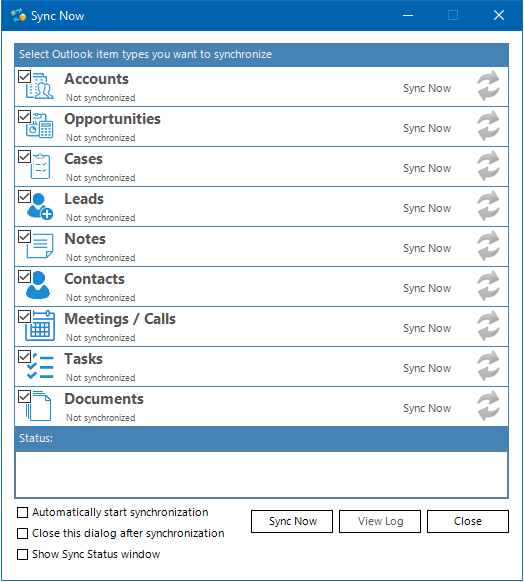
If you want to view the synchronization status, check the “Show Sync Status Window” and then click “Sync Now” to start the process. FrontEnd will notify you that it is switching to background mode and will continue to synchronize the CRM data in the background so you can continue working in Outlook while the synchronization is taking place.
Note:
While FrontEnd is still going through the initial sync cycle, all of its toolbar buttons except for ‘Sync Now’, are disabled:

and the side panel will display the following message:
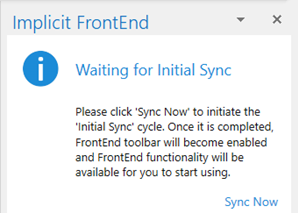
Once the initial sync is done, the buttons would be enabled, and the side-panel will become active and show the information for the selected email message. This is the indication that they sync cycle is complete and you can start using the system.
Troubleshooting Login/Connectivity Issues
If you’re getting an error trying to login to the CRM, please check the following:
- Check if the CRM server URL requires HTTPS or HTTP and specify the appropriate protocol.
- If you are unable to login with your CRM user ID and password, check with your CRM/IT admin if LDAP or SAML authentications are enabled on the CRM and if so, check the corresponding checkbox. If LDAP is enabled, your CRM admin needs to also provide you with a password that you will need to specify below the LDAP checkbox.
- If you are using a new instance of SugarCRM, FrontEnd will prompt you to enable API Platform. Please see: Enabling FrontEnd API Platform on the SugarCRM Server
- Make sure that you are able to communicate with the CRM server and there are no firewalls or proxies that are blocking the communication.
- Check if your SSL certificate is valid.
- If your CRM server has a self-signed SSL certificate, you’ll need to configure your browser to trust that certificate. By default, your IE/Edge browser and consequently .NET will reject self-signed SSL certificates unless you specifically include it in the list of trusted certificate authorities.
If you are still unable to communicate with the CRM server, retrieve the Implicit FrontEnd log file and send it to Implicit support via the contact support form on our website.
You can find the Implicit FrontEnd log file at this location:
C:\ProgramData\Implicit\Implicit FrontEnd\<long alphanumeric key>\ SyncAddinTrace.txt.
Please replace <long alphanumeric key> – with the folder name under the Implicit FrontEnd that looks like the following: S-3-7-99-1234567890-1234567890-1234567890-1234