Introduction
Overview
Implicit for Outlook consists of two components:
- Implicit for Outlook Desktop App
Implicit for Outlook Desktop App is installed on your Windows desktop and runs as a taskbar application. It allows you to keep your CRM calendar and contacts in full sync with Outlook and set rules for auto archiving of emails from Outlook to the CRM. - Implicit for Outlook Add-in
Implicit for Outlook Add-in provides a side-panel inside Outlook and allows you to view relevant CRM data in real-time as you receive and send emails to your customers and prospects. Furthermore, it enables you to browse, search, view, update and create new CRM records from Outlook as well as archive emails to records in the CRM.
Important Note: Before you start the user installation, please review the installation steps under the admin guide.
Trademarks
Implicit, the Implicit Logo, Implicit for Outlook, Implicit for Teams, and Implicit FrontEnd and combinations thereof are trademarks of Implicit Inc.
Microsoft, Microsoft Office, Microsoft Outlook, Microsoft Teams, Microsoft 365, and Windows are registered trademarks of Microsoft Corporation.
SugarCRM is a registered trademark of SugarCRM Inc.
SuiteCRM is a registered trademark of SalesAgility Ltd.
Other product names used in this publication are for identification purposes only and may be trademarks of their respective companies.
Disclaimer
The contents of this document are provided in connection with Implicit Inc. (“IMPLICIT”) and Implicit for Outlook product. IMPLICIT makes no representations or warranties with respect to the accuracy or completeness of the contents of this publication and reserves the right to make changes to specifications and product descriptions at any time without notice. No license, whether express, implied, arising by estoppel, or otherwise, to any intellectual property rights are granted by this publication. Except as set forth in Implicit for Outlook License Agreement, IMPLICIT assumes no liability whatsoever, and disclaims any express or implied warranty, relating to its products including, but not limited to, the implied warranty of merchantability, fitness for a particular purpose, or infringement of any intellectual property right. IMPLICIT’s products are not designed, intended, authorized or warranted for use as components in applications intended to support or sustain life, or in any other application in which the failure of IMPLCIT’s product could create a situation where personal injury, death, or severe property or environmental damage may occur. IMPLICIT reserves the right to discontinue or make changes to its products at any time without notice.
Supported Platforms
Microsoft Outlook
• Microsoft 365 or Microsoft Exchange (2013 and higher)
• Microsoft Outlook on Windows (Windows 11, Windows 10, Windows Server 2019, Windows Server 2016, Windows Server 2012 R2)
• Microsoft Outlook for Mac (macOS 10.14 Mojave or later).
• Microsoft Outlook Online (Microsoft Edge, Google Chrome, and Safari).
• Mobile: IOS and Android devices
CRM
SugarCRM and SuiteCRM.
Implicit for Outlook Add-in
User-level Installation Steps
There are two types of deployments of Implicit Outlook:
- Administrator installation on your corporate Microsoft 365 account – see: Implicit for Outlook – Admin Installation
- User-level installation on your personal Microsoft 365 account – If you are running a trial of Implicit for Outlook and wish to try it on your personal account before deploying it on the corporate 365 account, please follow the steps below.
Note 1: If your admin has already installed the add-in on your corporate account, do not install it again on your personal account. Please skip Step 1 and go directly to step2.
Note 2: For production, we recommend that you ask your administrator to install the add-in on the corporate account and not on individual user accounts, so it is accessible to all users. Please see Implicit for Outlook – Admin Installation
Prerequisites
Before you can start the user installation and configuration, please verify the following:
- Your CRM administrator has installed the Implicit for Outlook modules on your CRM as specified in the Admin Guide: “Installing Implicit Module on your CRM instance”.
- Make sure that you have the required permissions to install add-ins on your personal account. If your Microsoft 365 administrator disallowed that option, you will not be able to install it on your individual account, and it would need to be installed by the administrator only.
Step 1. Installing Implicit Outlook Add-in on Microsoft 365
If your CRM administrator has already installed the Implicit for Outlook add-in on your corporate Microsoft 365 account, you can skip this step and go to step 2. Otherwise go through the following steps:
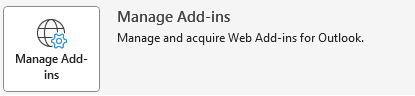
- In Outlook, select the File tab and click ‘Manage Add-Ins’
- Outlook will launch a browser and prompt you to login to your Microsoft 365 account. It will present you with a list of available Outlook add-ins.
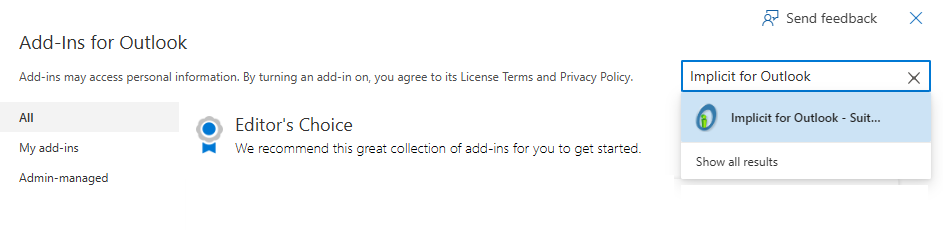
In the search add-ins box, enter “Implicit for Outlook”. The Implicit add-in will show up in a drop-down list under the search box. Select it. Microsoft App store will display the Implicit for Outlook page. Click ‘Add’. - It can take up to 12 hours sometimes for an add-in to be published through Microsoft 365 to all devices. Once it is deployed, users will be able to see the Implicit for Outlook button on the Outlook toolbar:

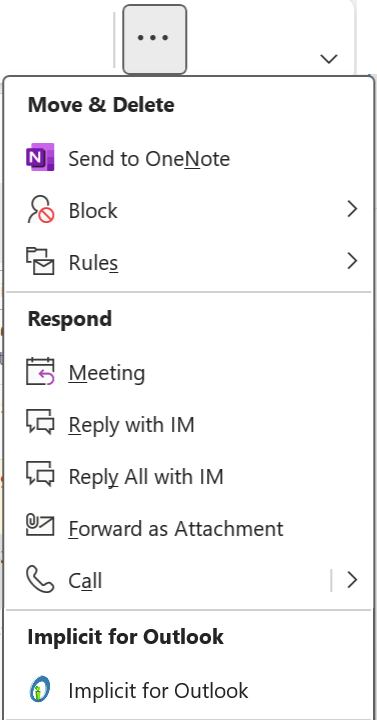
Note: Depending on the number of buttons you have configured on your Outlook ribbon, the Implicit button may also show up on the ‘More Commands’ (‘…’) button as show below:
Initial Configuration Wizard
Step 2. End User License Agreement
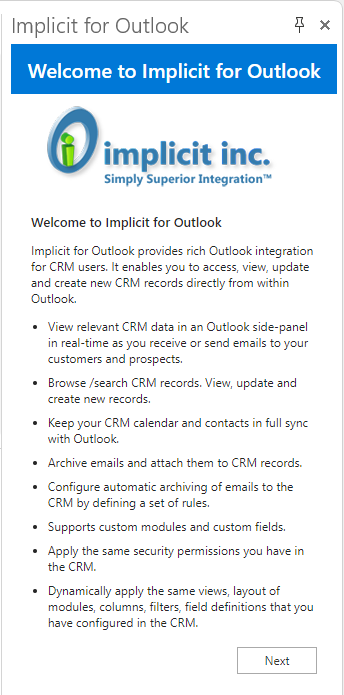
When the Implicit for Outlook add-in shows up in Outlook, click on Implicit for Outlook button on the Outlook toolbar to launch the side panel. The side-panel will display the welcome screen:
You will then be prompted to accept the End Use License Agreement:
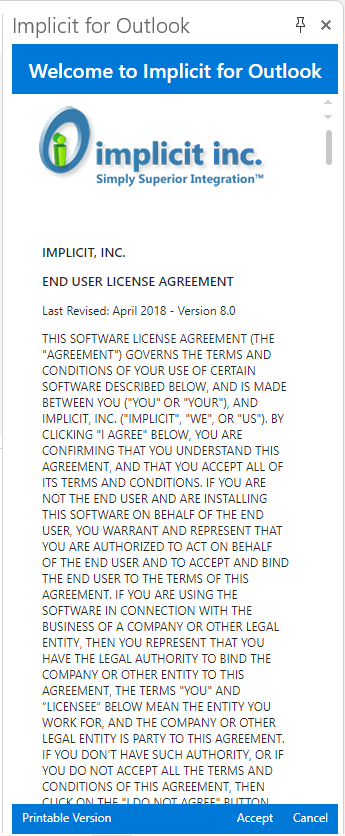
Please review the license agreement and if you agree, click ‘Accept’. Otherwise, please click cancel to exit Implicit for Outlook.
Step 3. License key
Next, you’ll be prompted to enter the Implicit for Outlook license key that you’ve received from Implicit, from your CRM admin, or from the store where you purchased a license. If the license is registered under your organization’s domain name (via the Implicit website or the store where you purchased the license), you can click “Load My Configuration” to retrieve the license key. Otherwise, please manually enter your license key and click ‘Continue’.

Step 4. Downloading & Installing the Implicit Desktop App.
Note: If your organization requires admin privileges to install software on desktops, please ask your administrator to install it locally or install it centrally over the network.
Next, the wizard will check if the Implicit Desktop App has already been installed and configured. If not found, or not configured yet, it will prompt you to download and install it. Click the “Download and Install” button and follow the directions for installing the Implicit Desktop App. Once the installation is complete, you’ll be prompted to configure is. Please follow the instructions for Configuring the Desktop App
After you’re done configuring the Desktop App., go back to Outlook and click ‘Continue’ in the side panel.
This concludes the installation process of the Implicit Outlook add-in. Upon clicking ‘Continue’ the add-in becomes active.
Step 5. For Mac and Mobile-only Users
If you’re installing Implicit for Outlook on Mac or on mobile (without prior Windows installation), instead of Step 4 to install the Implicit Desktop App., you will be prompted to check connectivity to your CRM server. Specifically, it will verify that your CRM server is configured with a setting called “CORS”. For the Implicit app to work inside Outlook, Cross-Origin Resource Sharing (CORS) must be enabled on the CRM server. As part of the administrator installation of Implicit for Outlook, your admin needs to install the Implicit for Outlook module which enables CORS on your CRM server. Please see: Installing Implicit for Outlook Module on the CRM Server
Enter the URL for your CRM server. This is the same URL you use to login to your CRM via the browser. Please make sure to specify HTTPS for secure access and specify only the first part of the URL to the CRM root folder. For example: “https://crm.implicitweb.com/”.
Click ‘Check Connectivity’. You will receive confirmation that connectivity to your CRM server has been verified, or an error message.

Next, you’ll be prompted to login to your CRM. Enter the username and password of your CRM account. If you are using SMAL Single Sign on (SSO), leave the username and password fields empty and check for box for SAML Single Sign on.

Terms of Service and Privacy Policy – Please review Implicit’s Terms of Service and Privacy Policy and if you accept both, check the box indicating that you have reviewed and agree to the terms. To use Implicit for Outlook, you also need to agree to have your name, email address and CRM username sent to Implicit and to be associated with your implicit license. If you don’t agree, please click the X button to close the side-panel and cancel the login.
If you would like Implicit to notify you by email about any future software updates, check the box and click ‘Login’.
Implicit for Outlook will log you in to the CRM and become active.
Using Implicit for Outlook
Email Side Panel
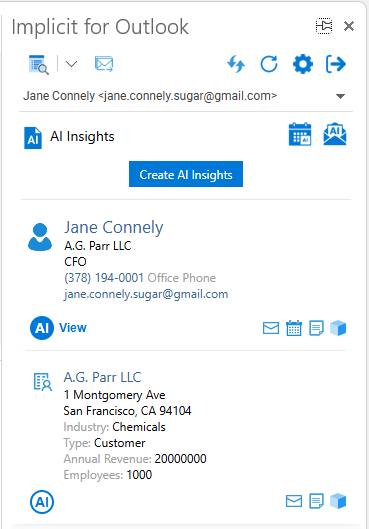
The Email side panel is an extremely useful and functional feature to view relevant CRM information related to emails’ senders/recipients and take immediate actions.
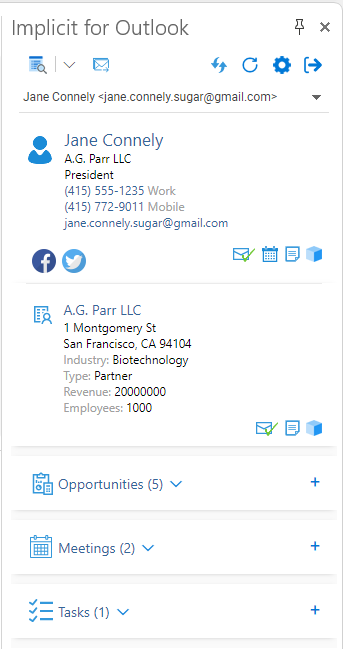
The side panel is divided into sections:
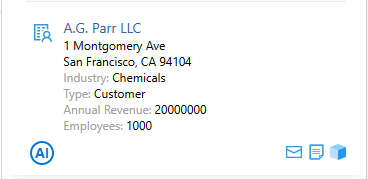
- Contact / Lead information.
- Account Information.
- Related modules information (based on the modules selected under options).
Contact / Lead and Account Information
The side panel shows the contact information for the contact/lead and the account and supports the following actions:
- View/Edit – Clicking on the name opens the records for viewing/editing.
- Archive – the email to the contact/lead and account records.
- Schedule a meeting
- Quick Note – Create a quick note and store in the contact’s or account’s CRM
records. - Open in CRM – Launch a browser and open the record in the CRM.
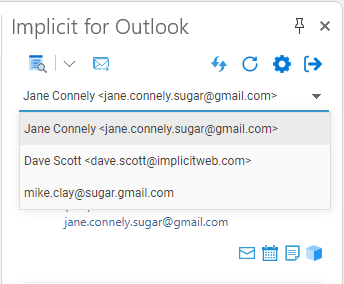
Multiple Email Recipients
If there are multiple recipients in the email message, you’ll notice that there is a drop-down arrow at the top, which shows you the email addresses of all recipients and allows you to switch the side panel to display the information for the select recipient:
Related CRM Records
Below the contact and account information, the side panel display the modules that you have selected to show under Settings including the number of records under each module type. To view related records, expand the section by clicking on the down arrow:
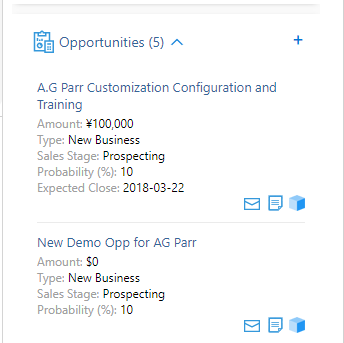
In the example above, the opportunities section is expanded, and user can view the most recent active opportunities.
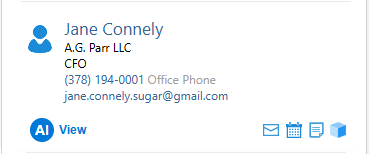
User Actions
Similar to user actions for contact/account, Implicit for Outlook allows you to:
- View/Edit – Clicking on the name of the record opens the record inside the side-panel for viewing/editing.
- Archive the email to the related CRM record (e.g. opportunity or case)
- Quick Note – Create a quick note and store in the CRM record.
- Open in CRM – Launch a browser and open the record in the CRM
- Add a Record (‘+’) – Add an opportunity, case, meeting task or any other module type that you selected for the side panel.
Quick Notes
To create a quick note for any of the CRM records, click the ‘Quick Note’ icon next to the record. A small note window will open up ‘in-place’ to allow you to type the note directly to the side panel and save it to the CRM:
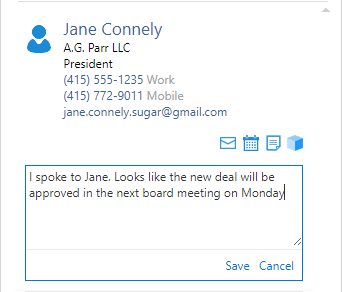
After saving the note, you’ll receive confirmation that the note was successfully saved. The note icon will turn green to indicate that you have created a note for this email and this record. This indicator is persistent which means that if you close the email and come back to it later, you would be able to open and make changes to the note.
Creating a Contact / Lead record from Email
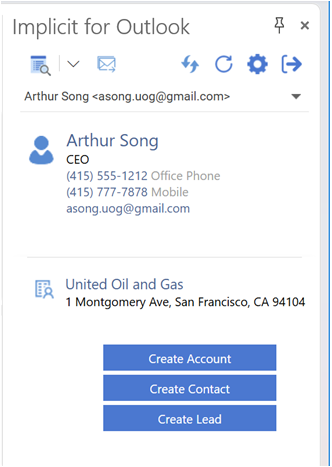
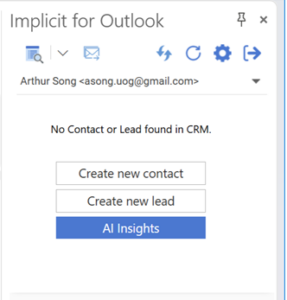
If the email is received from an unknown contact or a lead it will display an ‘Unknow contact’ message:
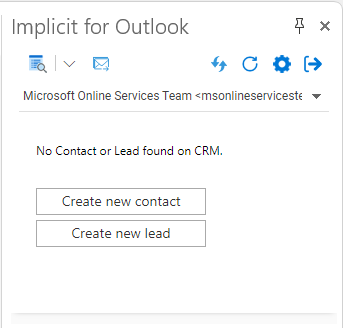
Upon clicking the button to create a new contact, the contact form opens up in the side panel. On how to create contact or leads from email see Contact / Lead section. Upon creating the new contact, Implicit for Outlook will refresh the detailed view and display the information you entered for the contact and the account.
Working with CRM Records inside Outlook
Viewing CRM Records
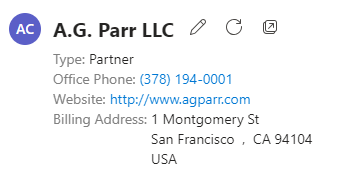
To view a CRM record, simply click on its name in the side panel. The record opens up in Outlook and displays the content of the record:
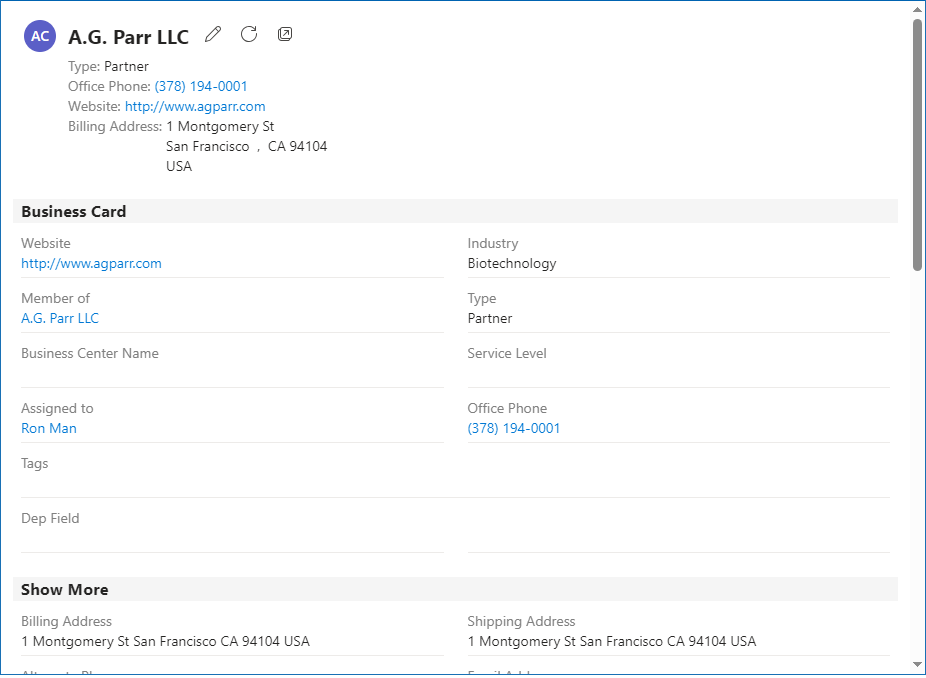
CRM records inside Outlook are displayed in their native CRM format. This includes:
Layout is the same as it was defined in the CRM including standard and custom fields.
- All fields’ attributes.
- Mandatory fields.
- Read-only fields.
Permissions are enforced exactly as in the CRM which means that users who do not have permissions to access certain record types will not be able to view them in Implicit for Outlook.
If users have permission to access but not to edit, the pencil button at the top of the record will not be visible.
The ‘Related’ section includes all the related CRM records, each with its key attributes, arranged in the form of cards:
 You can view any of the related records simply by clicking on the name.
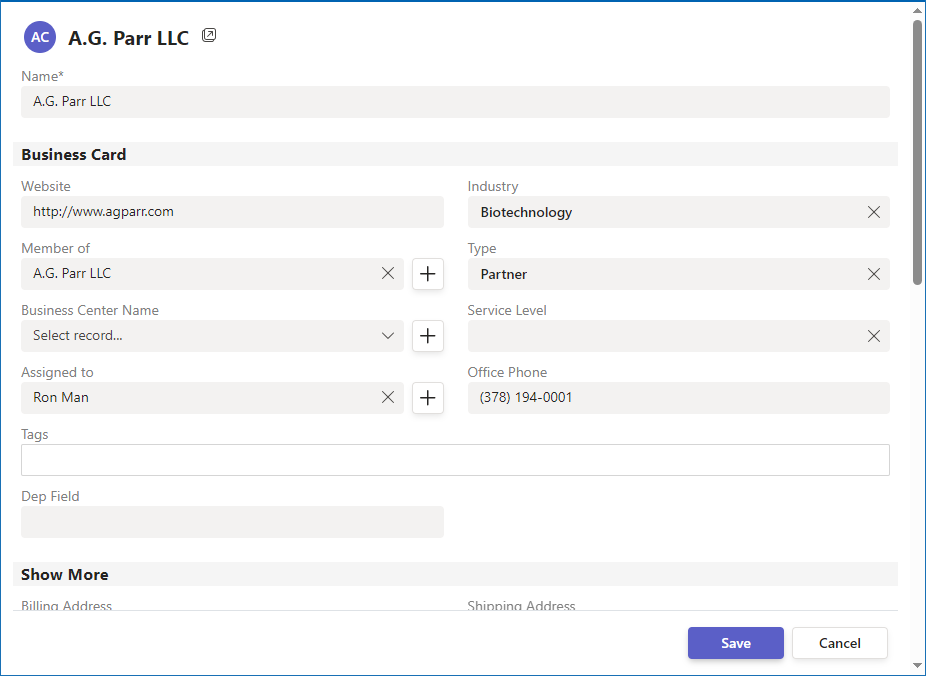
Editing CRM Records
If you have permission to edit a CRM record, you can edit it from within Outlook by clicking the pencil icon next to its name. Otherwise, if you don’t have permission to edit certain records, the pencil button will be hidden.
The record opens for editing, and you can modify any of its fields exactly as you do in the CRM.
Browsing and Searching CRM Records
Implicit for Outlook allows you to browse, search, view and edit CRM record directly from Outlook. You can launch the CRM browser window from the side-panel by clicking the browse button. You can click the drop-down to select the module to browse, or click the button browse the previously selected module type:

The browse window will open and display a list of records:
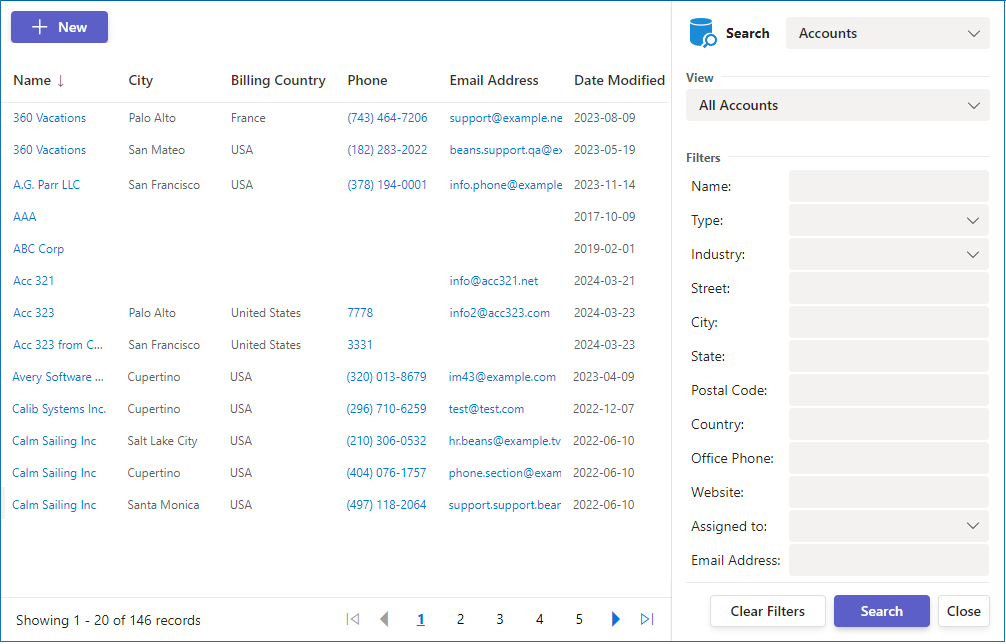
By default, the list will show all records. As you can see in the screenshot above where in this example, the ‘Accounts’ module was selected, the view is set by default to ‘All Accounts’.
You can change the view by clicking the view drop-down and selecting one of the following views:
- All Records.
- My Records – Records assigned to me.
- Recently viewed records.
- Recently created records.
In addition, you can specify a set of filters to filter the list to the records you are searching for. For example, for accounts you can filter by account name, type, industry, email, phone number etc.

For more information about viewing and editing CRM record, see section: “Working with CRM Records in Outlook”
Synchronizing Outlook Meetings
Synchronizing meeting from Outlook to CRM
To sync Outlook meetings to your CRM, open the meeting in Outlook and click the Implicit for Outlook button on the Outlook ribbon:

The side panel opens up to allow you to relate the meeting to a record in the CRM. By default, the ‘Sync this meeting with CRM’ checkbox is selected. This selection also associates the meeting with an Outlook category called ‘Implicit for Outlook’ which marks the meeting to be synced to the CRM upon the next sync cycle.
Select the following fields:
- Module – Module type to relate the meeting to
- Record – Start typing the name of the record. The side panel will display all possible matches and allow you to select the one you want.
- User – By default the meeting will be assigned to you as the organizer.
- Meeting or Call – Select whether the Outlook meeting should be synced to a CRM meeting or a call.
- Meeting Type – This field reflects the ‘Meeting Type’ field in the CRM.
- Status – This field reflects the ‘Meeting Status’ field in the CRM
When you’re ready to send the invite (or an update to a meeting), click ‘Send’. If you are syncing a meeting that already exists in Outlook, click ‘Save’. The meeting will be synced on the next sync cycle.
Synchronizing meetings from CRM to Outlook
If you’ve configured meetings to sync from CRM to Outlook, any new, modified or deleted meetings in the CRM that are assigned to you will be synced to your Outlook calendar automatically on each manual or automatic sync cycle. Those meetings will show up in your Outlook calendar with the green ‘Implicit for Outlook’ category. At any time, you can which CRM record they are related to by opening the meeting and clicking the ‘Implicit for Outlook’ to open the side panel.
Email Archiving
One-Click Email Archiving
To archive an email to a record on the side-panel, simply click the envelop icon next to that record:
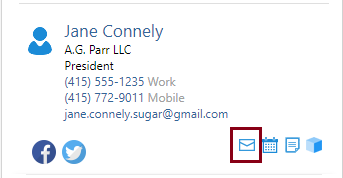
The currently selected email will be archived to the record and you will receive confirmation in the status bar on the bottom of the side panel.
![]()
You’ll also notice that a green checkmark is added to the email envelop icon to indicate that the email has been archived to this record. This is a persistent indicator that remains as part of the email such that if you close the email and come back to it later, you would be able to see which records the email archived to.

Notes:
- The envelop icon is visible only for modules that have relationships with the email module in your CRM.
- The email upload will adhere to the limitations you configured for attachments under the options page.
- Archiving to a contact, will automatically archive the email to the account and vice versa.
Advanced Email Archiving
Since only the most recent records of each module will be visible on the side panel, there will be situations where the record you’re looking for, will not be visible on the details view. In these cases, or when you need to archive the email to more than one record, click the ‘Advanced’ tab for more advanced email archiving options:
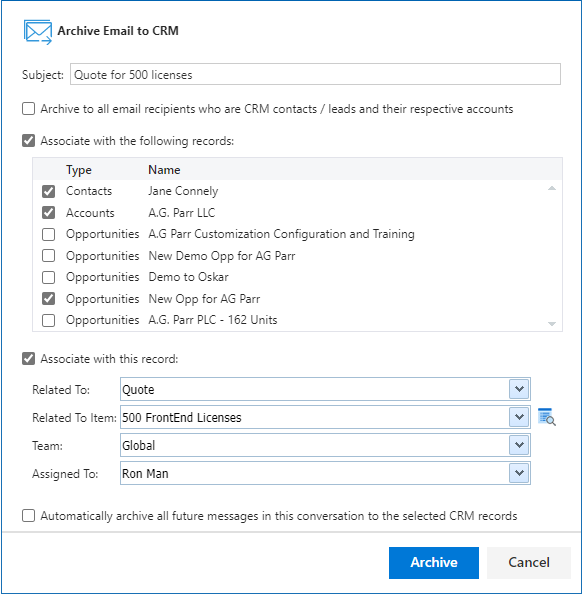
The archive dialog provides you with three options to associate the archived email:
- Archive each message with its respective CRM contact / lead and account records – this is default option and a common practice for most CRM
users. - The system displays a list of all records associated with the account. If you want to associate the email with a different record such as an opportunity or a case, select the second option and check the desired boxes.
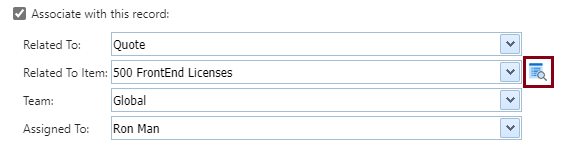
- If you want to associate the email with a different record which is not part of that account, select the third option and choose the type and
actual record which the email should be related to. You can start typing the name of the record in the “Related To Item” field or you can click the search button to search for the desired record.
To associate the archived email with a ‘Security Group’ in SuiteCRM or with a ‘Team’ in SugarCRM, select the team/group.
Implicit for Outlook Add-in Settings
To open the settings screen, click the settings button on the top-right corner of the side panel. The Settings screen includes multiple tabs:
General Settings Tab
It allows you to configure the following settings:
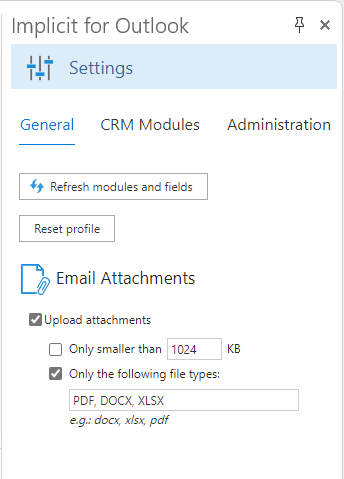
- Refresh modules and fields – If any of CRM modules/fields have been modified since you started using Implicit for Outlook, click refresh to retrieve the updated configuration.
- Upload Attachments – Check the box to enable email attachments to be uploaded and archived:
- Only Smaller than – If you want to limit attachments by size, check the box and specify the size of maximum size of attachments (in KB).
- Only the Following File Types – If you want to limit attachments by type, check the box and specify a comma delimited list of file extension that you allow to archive, for example: docx, xlsx, pdf etc.
Modules Settings Tab
The ‘CRM Modules’ tab allows you to select the CRM modules that you want to access, view and update from within Implicit for Outlook. Uncheck the modules that you don’t need to access from Outlook.
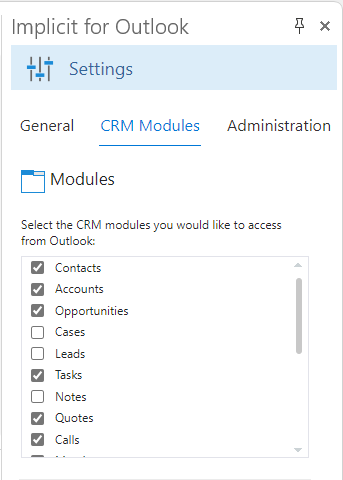
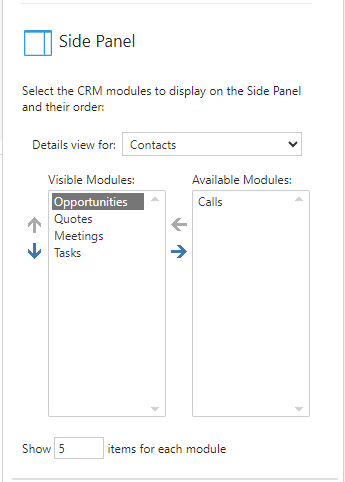
You can also configure the modules that you would like to display in the side panel. You can specify different lists of modules for contacts and for leads. The list on the right shows all available modules and the list on the left shows the ones that are visible in the details pane. Use the arrows to add or remove modules from the list.
At the bottom, select how many records of each type should be displayed in the side module. The records are displayed from the most recent to the oldest.
Administration Tab
As a CRM administrator, you can create a configuration for all the side-panel functionality and publish it to your CRM instance that all Implicit for Outlook users can use it:
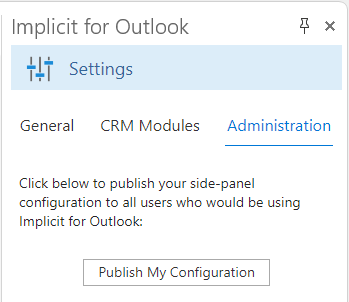
The configuration of the side-panel includes all the settings under the General Tab and the CRM Modules Tab:
- Which CRM modules are accessible to users from Outlook
- Which CRM modules are visible on the Outlook side-panel
- Should browsing and searching for CRM records be done in Outlook or the CRM (browser).
- Rules for archiving Email attachments.
Implicit for Outlook Desktop App
User Installation
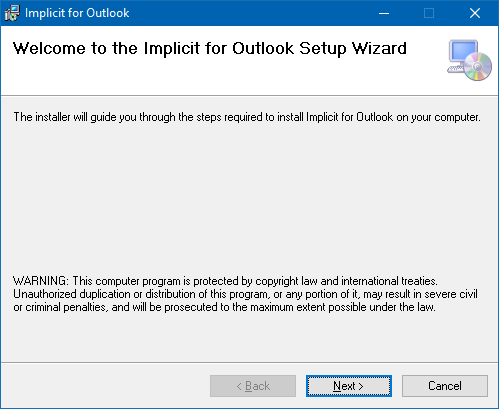
Before running the installation, please make sure close any application that is running on your desktop.
Download and run the executable installer that you’ve received from Implicit. The installer wizard will walk you through a set of screens:
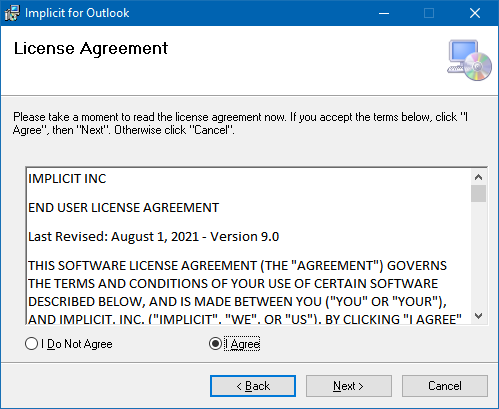
Click Next to continue. You will be prompted accept the Implicit EULA:
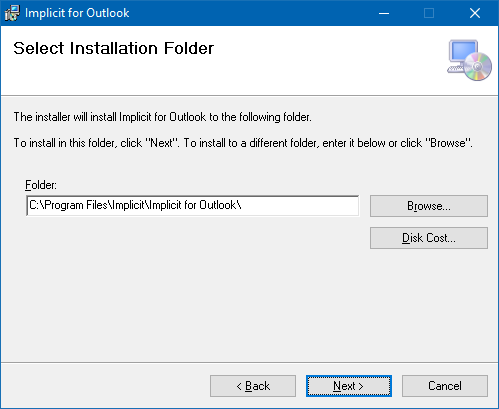
Next, you will be prompted to select the installation folder. By default, the installation folder will be set to: “\Program Files\Implicit\Implicit for Outlook”.
Choose Browse to select a different folder. Then click ‘Next’.
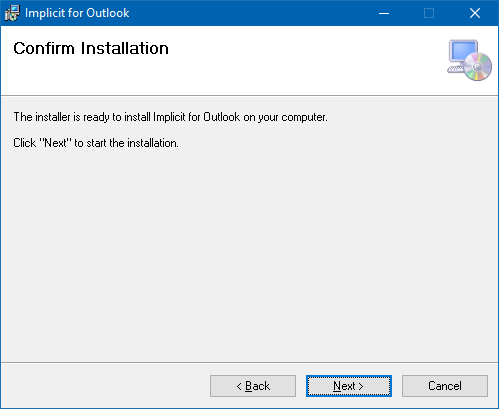
Next, the installer will be prompt you to confirm the installation and start copying the files:
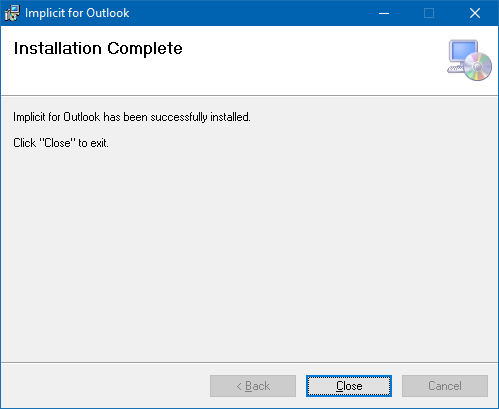
Upon completion it will launch the configuration tool.
Note: The Implicit Desktop App. runs as constantly as a background Windows taskbar application and synchronizes data between Outlook and your CRM. If at any time it is stopped, please run it again by entering “Implicit for Outlook” in the Search Box in the Windows taskbar.
Upgrading from Implicit FrontEnd
If you are upgrading from a previous version of Implicit FrontEnd, please make sure to force a synchronization cycle by clicking ‘Sync Now’, and then uninstall Implicit FrontEnd before proceeding with the installation of Implicit for Outlook.
Implicit for Outlook – Desktop App Configuration
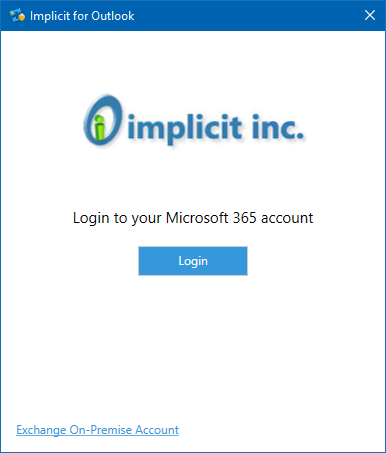
The first step in the configuration process is to login to your Microsoft 365 account:
Next, you’ll be prompted to enter your license key and login to your CRM account:
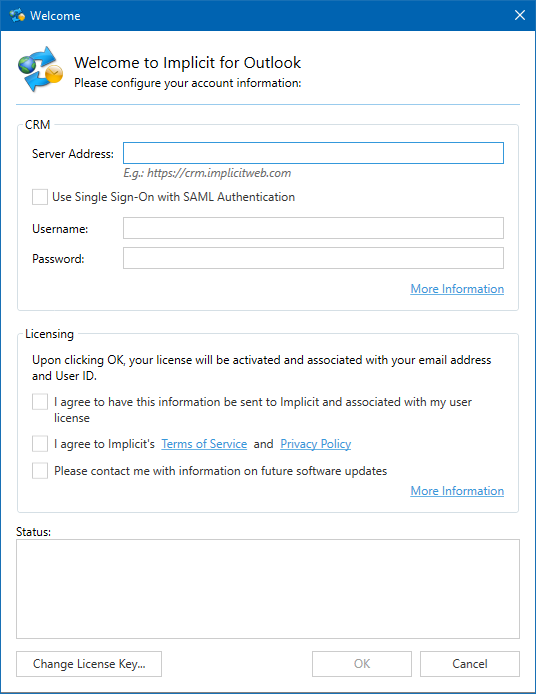
If your account has already been configured by your admin, click “Load My Configuration” to load your license key and CRM URL. Otherwise, enter the license key that you’ve received from Implicit. If you don’t have a license key yet, you can sign up for a free trial of Implicit for Outlook.
Next, enter the URL to your CRM. This is the same URL you use to login to your CRM via the browser. Please make sure to specify HTTPS for secure access and specify only the URL to the CRM root folder. For example: “https://crm.implicitweb.com/”.
If you are not using SMAL Single Sign on (SSO), enter your username and password, otherwise leave the username and password fields empty and check for box for SAML SSO.
Terms of Service and Privacy Policy – Please review Implicit’s Terms of Service and Privacy Policy and if you accept both, check the box indicating that you have reviewed and agree to the terms. To use Implicit for Outlook, you also need to agree to have your name, email address and CRM username sent to Implicit and to be associated with your implicit license. If you don’t agree, please click the X button to close the side-panel and cancel the login.
If you would like Implicit to notify you by email about any future software updates, check the box and click ‘Login’.
Upon successful login to your CRM account, you’ll be prompted to configure the sync parameters between your Outlook mailbox and your CRM account.
General Tab
The CRM account section displays your CRM URL, and your username. You can click ‘Verify’ to verify that you are able to login to the CRM.
Note: these two sections are read only. If you need to change your CRM URL or account or your Microsoft 365 account, you’ll need to reset the configuration via the Advanced tab.
Microsoft Exchange Account
If you are using an Exchange server as your email server (on-prem or hosted), enter the URL to your Exchange server. The URL should be specified as follows: https://<Exchange server Name>/EWS/Exchange.asmx
Next, specify your username and password and click ‘Verify’ to make sure you can log in to the Exchange server.
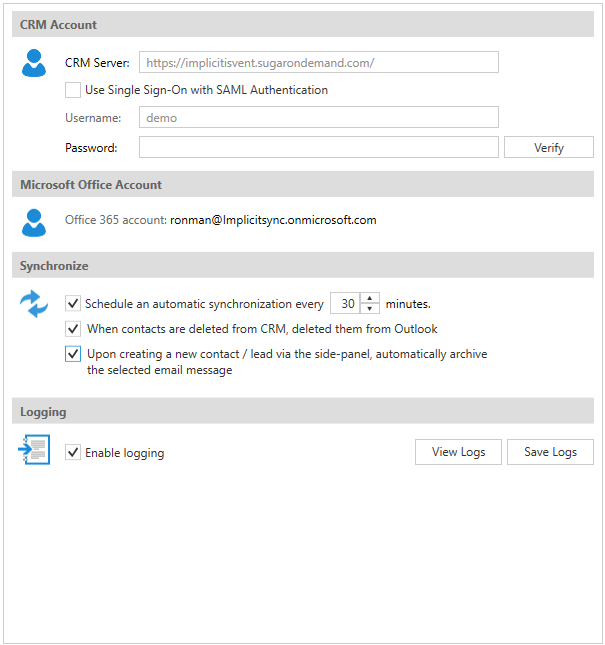
Synchronize Section
This section allows you to configure several settings related to synchronization:
- Automatic background synchronization and how often
- When contacts are deleted from CRM – should they be deleted from Outlook
- When creating a contact/lead from an email – should the email itself be archived to the CRM and related to the contact/lead record that you created?
Log File
Allows you to select the maximum size of the log file and view the log.
Sync Tab
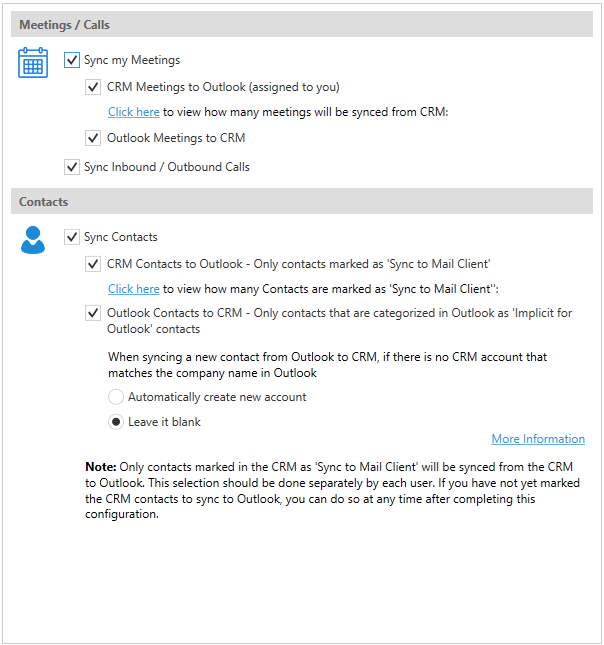
This tab allows you to configure the settings for two-way synchronization of calendar and contacts between Outlook and your CRM.
Meeting Synchronization
To sync Meetings, check ‘Sync My Meetings’ and select the synchronization direction: from CRM to Outlook and vice versa.
You can view how many meetings will be synced for the CRM to your Outlook upon the initial synchronization cycle, by clicking the link.
To sync inbound or outbound Calls, check the box.
Contacts Synchronization
To sync contacts from CRM to Outlook, check the box.
Syncing Contacts from CRM to Outlook
Important Note for SugarCRM users: Only contacts that are marked as “Sync to Mail Client” in SugarCRM will be synced to Outlook. If you have not selected the contacts you wish to sync from SugarCRM to Outlook, please do so before you run the first sync cycle. For more information, refer to Selecting CRM contacts to sync to Outlook.
Important Note for SuiteCRM users: Only contacts that are marked as “Sync to Outlook” in SuiteCRM will be synced to Outlook. If you have not selected the contacts you wish to sync from SuiteCRM to Outlook, please do so before you run the initial sync cycle. For more information, refer to Selecting CRM contacts to sync to Outlook.
Once you mark the contacts in the CRM that you’d like to sync to Outlook, click the ‘Click Here’ link to find out how many contacts will be synced during the first sync cycle to Outlook.
Syncing Contacts from Outlook to CRM
To mark the Outlook contacts to be synced to the CRM, use the “Implicit for Outlook” category in Outlook.
When you sync new contacts from Outlook to the CRM, there may be situations where the company name specified in Outlook may be different than the account name in the CRM. To help us resolve this potential conflict, please select the desired behavior: if there is no account that matches the contact’s company name in Outlook. The options are:
- Create a new account based on the company name in Outlook and link it to the contact.
- Leave the account field as blank and don’t automatically associate the contact with any existing account. That gives you the option of manually selecting the account.
AI Insights Tab
Note: This tab is enabled only if OpenAI service is enabled and has been configured in your environment and your CRM admin has given users permission to use AI insights.
 Meetings AI Insights
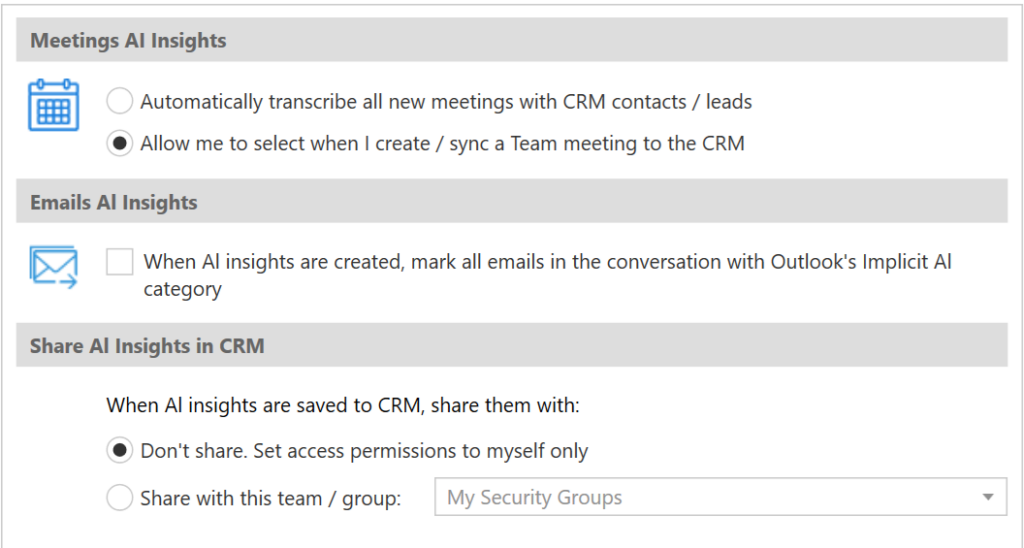
You have the option to select the default behavior of which Teams meetings should be transcribed and analyzed by AI:
- All meetings that include CRM contacts or leads as participants should be automatically transcribed and AI insights should be generated
- You will have the option to turn on transcription and AI insights at the time of creating the meeting invite
Email AI Insights
You have the option of marking all emails in an email conversation with an Implicit AI category when AI insights were generated for that conversation.
Share AI insights – Applies to both Meetings and Email
When AI insights are saved in the CRM, they are always assigned to you. You have the option of sharing them with a specific team/security group. Only members of the team / group you specify will be able to access to AI insights that you save in the CRM.
Administration Tab
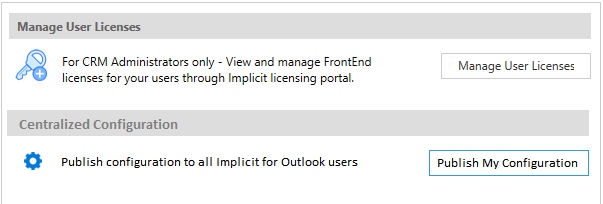
The Administration tab functionality is enabled for CRM administrators. It allows you to:
- Manage Users Licenses – As a CRM administrator, you have access to manage Implicit for Outlook licenses for your users (this functionality is only available to administrators). You will be redirected to the Implicit FrontEnd licensing portal where you can:
- View Your corporate license information, start date, renewal date etc.
- View How many licenses are being used and by whom.
- View The Implicit for Outlook version that each user is using and since when.
- Re-assign licenses when users leave the company and other users join.
- Add user licenses.
- Renew your corporate license.
- Centralized Configuration – As a CRM administrator, you can centrally create and publish a configuration for all Implicit for Outlook users. The configuration includes:
- All settings of the Implicit for Outlook 365 side-panel
- Auto sync on/off and interval
- Synchronization settings for: meetings, calls and contacts
- Corporate-level email auto-archiving rules
To create and publish the configuration to your users, configure the settings for Implicit for Outlook on your desktop and click “Publish My Configuration”. The configuration will be published to the ‘Global’ team or security group on your CRM. Please make sure that users have access to the Documents and Teams/Security Groups modules on the CRM in order to load that configuration to their account.
Advanced Tab

The advanced tab allows you to:
Reset Configuration – Use Reset Configuration only if you need to
switch from one server to another or if you need to switch user accounts. In
this case synchronization cannot be maintained across accounts, and it is
therefore necessary to reset Implicit FrontEnd to its initial state and
re-synchronize the data from the new server/account.
Sync Now
You can trigger a manual sync cycle at any time by selecting ‘Sync Now’ on the taskbar app.
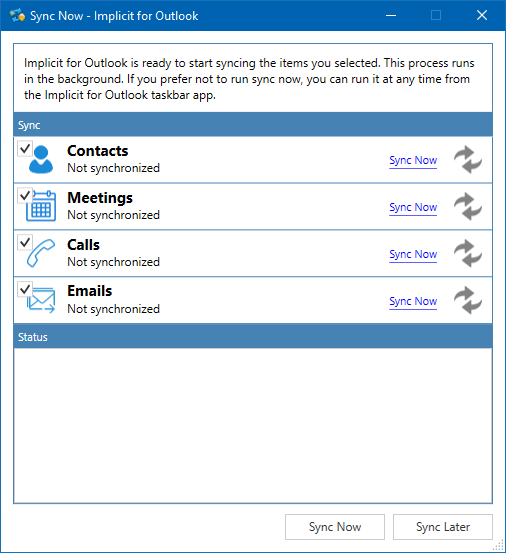
You can turn on/off each module type separately and also choose to sync only a specific module by clicking ‘Sync Now’ link for that module only.
Important Note: Prior to running the sync cycle for the first time, please make sure that you mark those CRM contacts that you wish to sync to Outlook by setting “Sync to Mail Client” on SugarCRM or “Sync to Outlook” on SuiteCRM. Please refer to section Syncing Contacts from CRM to Outlook.
Email Archiving Rules
Implicit offers a rule-based engine for archiving emails. Similar to Outlook’s native rules engine, you can define different rules for email archiving in the CRM:
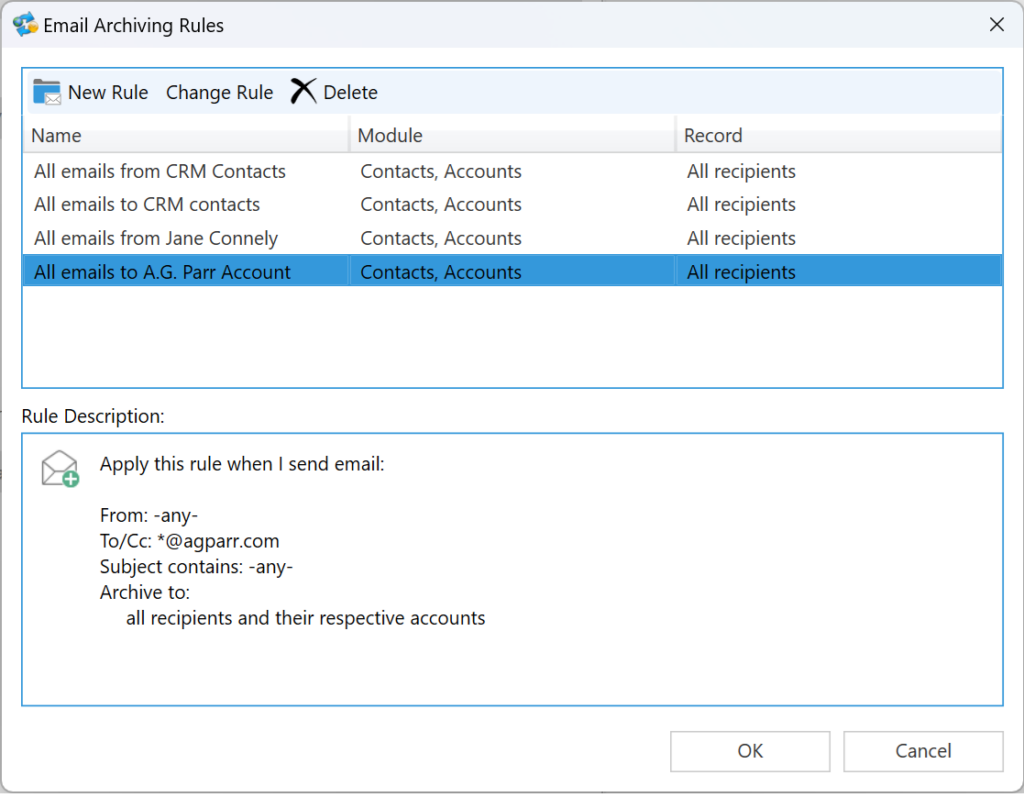
You can create new rules, modify or delete them.
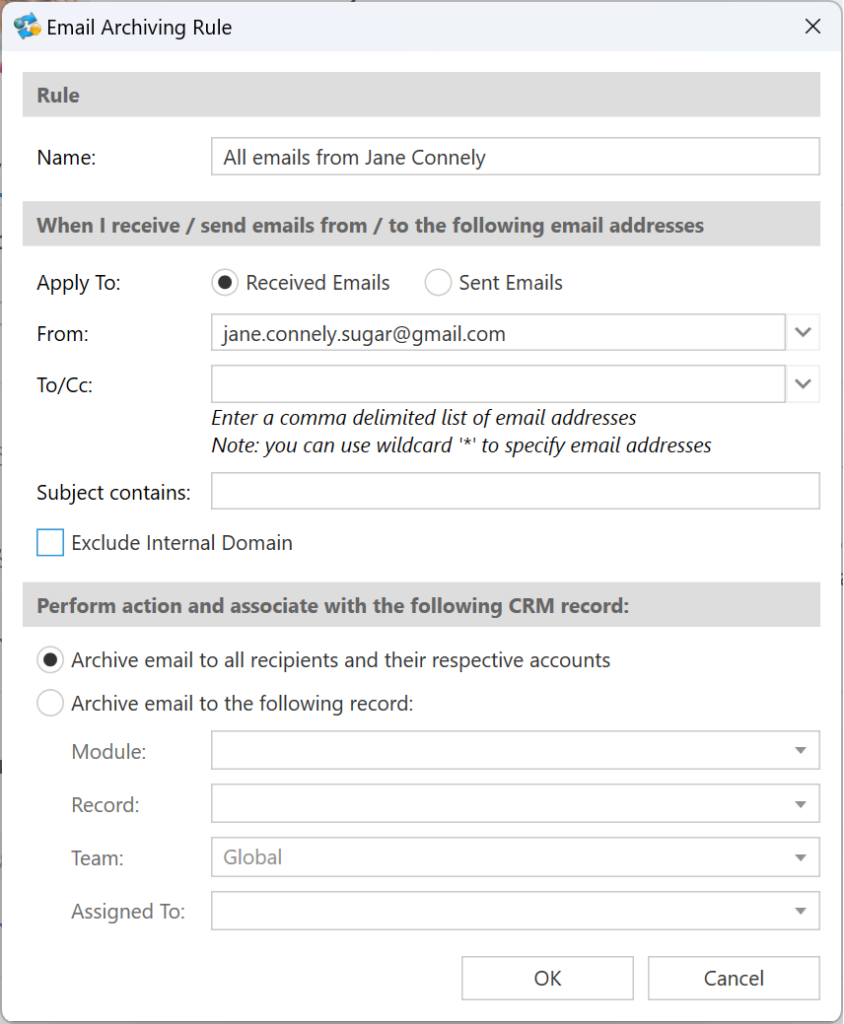
As you can see in the above screenshot, a rule consists of the following:
- Rule Name – Assign any name which is meaningful to you
- Apply To – Choose to apply to received emails or sent emails.
- From – The email address from which the email was received from or sent from. The following options are available:
- Any Contact – Select ‘Any Contact’ if you would like to create a rule that applies to emails from/to any CRM contact
- Any Lead – Select ‘Any Lead’ if you would like to create a rule that applies to emails from/to any CRM lead
- Specify Email Address(es)
- To/CC – The email address to which the email was sent to. Same options as described above
- Subject Contains – Rules based on words or phrases in the email subject.
- Select CRM Record – You have two options:
- Archive the email to all recipients and their respective accounts – In this case the records will be determined at run-time based on the email addresses of the recipients (if they are found as CRM contacts/leads and their
parent accounts. - Archive to a specific record that is determined at the time of creating/editing the rule.
- Archive the email to all recipients and their respective accounts – In this case the records will be determined at run-time based on the email addresses of the recipients (if they are found as CRM contacts/leads and their
- Exclude Internal Domain – If you have your users defined as CRM contacts, make sure to exclude internal domain to avoid archiving internal emails.
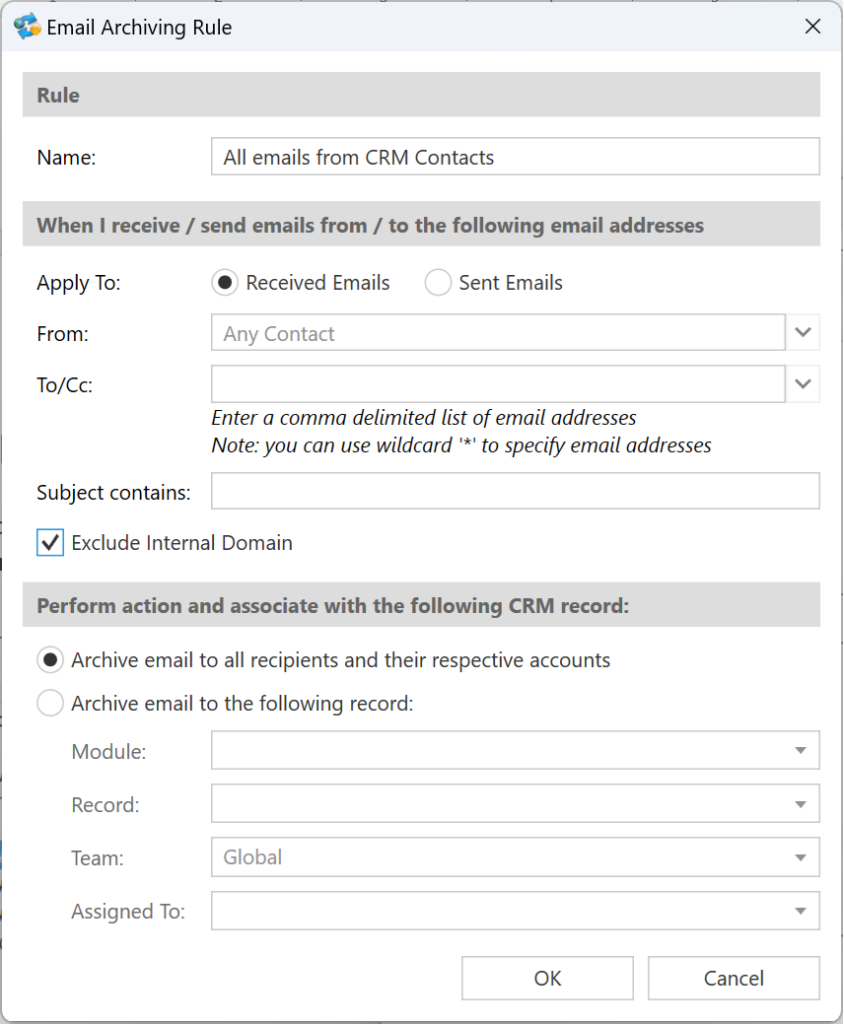
Rules for Archiving All Emails from/to CRM Contacts
If your intention is to archive all emails that are received from CRM contacts or sent to CRM contacts, create the following 2 rules:
Archive all emails from CRM Contacts
Archive all emails to CRM Contacts
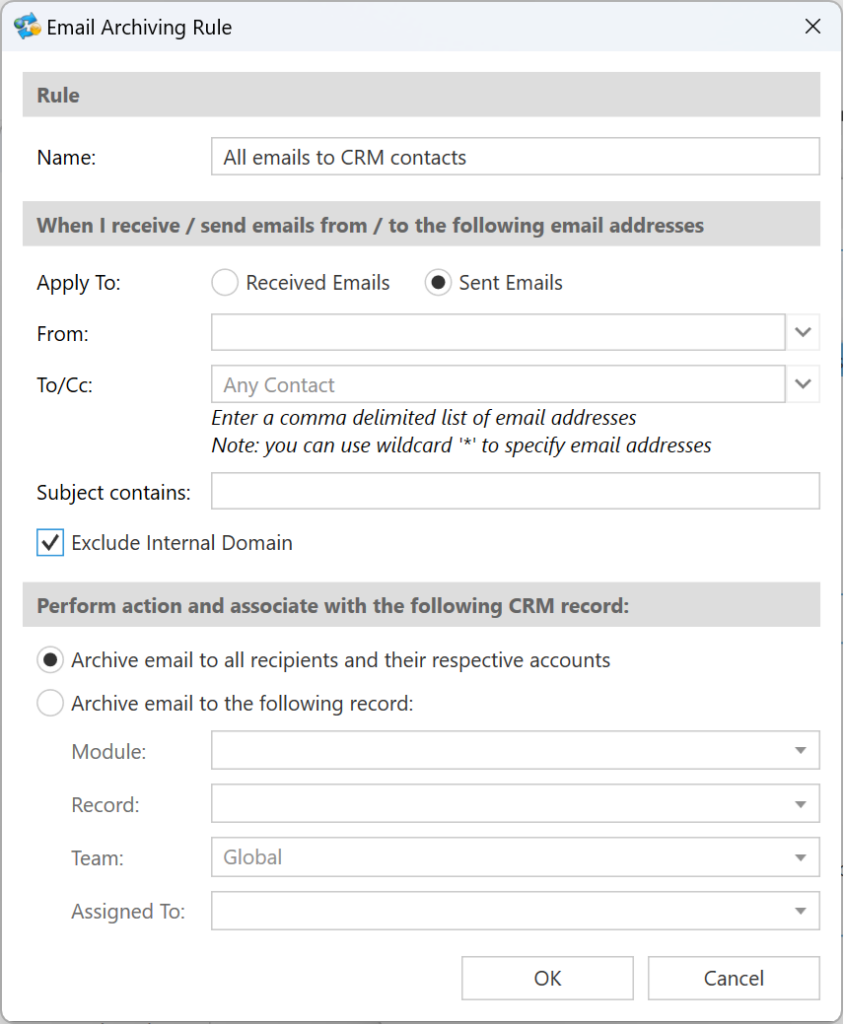
Note: If you’d like to enforce this policy for all users, we recommend that your CRM admin creates these two rules prior to publishing the configuration to other user.
AI Insights
Introduction
Overview
Implicit for Outlook allows you to generate AI insights for Teams meetings and Outlook emails. It integrates with Microsoft Teams, Microsoft Outlook and OpenAI service on Microsoft 365 Azure to summarize and provide functional insights into your interactions with your customers via Outlook. There are four types of AI Insights:
- AI Insights into customers’ email threads in Outlook. Create AI insight for an Outlook email conversation that you’ve had with a customer. Typically, the conversation revolves around a specific theme and can include multiple email senders and recipients over a period of time.
- AI Insights into customers’ emails in CRM Records. Create AI insights based on all the emails that were archived to a CRM record by any of the users.
- AI Insights into customers’ Meetings. Create AI insights based on transcripts of your Teams meetings with customers.
- AI Insights into Contacts and Leads CRM Information. Use AI to extract CRM information from emails and meetings and create CRM records.
Prerequisites
For users to have access to AI functionality, the following is required:
1. Your Microsoft 365 admin has subscribed to Azure OpenAI service
2. Your CRM admin has configured the AI resource in Implicit Desktop app, has enabled AI Insights and has published the configuration to all users.
Emails AI Insights
To create AI Insights for Outlook threads, select an email from a contact or lead, and on the side-panel click on the ‘Create AI Insights’ button.
You’ll notice that the button’s label changes to ‘Creating AI Insights’. The process may take some time depending on the number of emails in the selected conversation. During that time, you may continue working in Outlook. When the AI Insights are created and ready to be viewed, you will be notified in the side-panel, and the button will turn into ‘View AI Insights’.
Viewing All Email AI Insights for an Account
To view all AI insights for Outlook conversations related to the selected account, click the ‘AI Search’ button on the side-panel.

Implicit for Outlook will present a list of Email conversations related to the CRM module and record that you select.
AI Insights for CRM Records
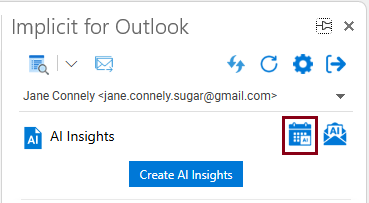
To create AI Insights for CRM Records, select an email from a contact or lead, and on the side-panel click on the ‘AI’ button next to record.
This will trigger the creation of AI Insights for all the emails stored in the CRM and related to this record. Once the process is done, the icon will change and show ‘AI View’.
Email AI Insights Report
Clicking the view button will open the Email AI Insights window:
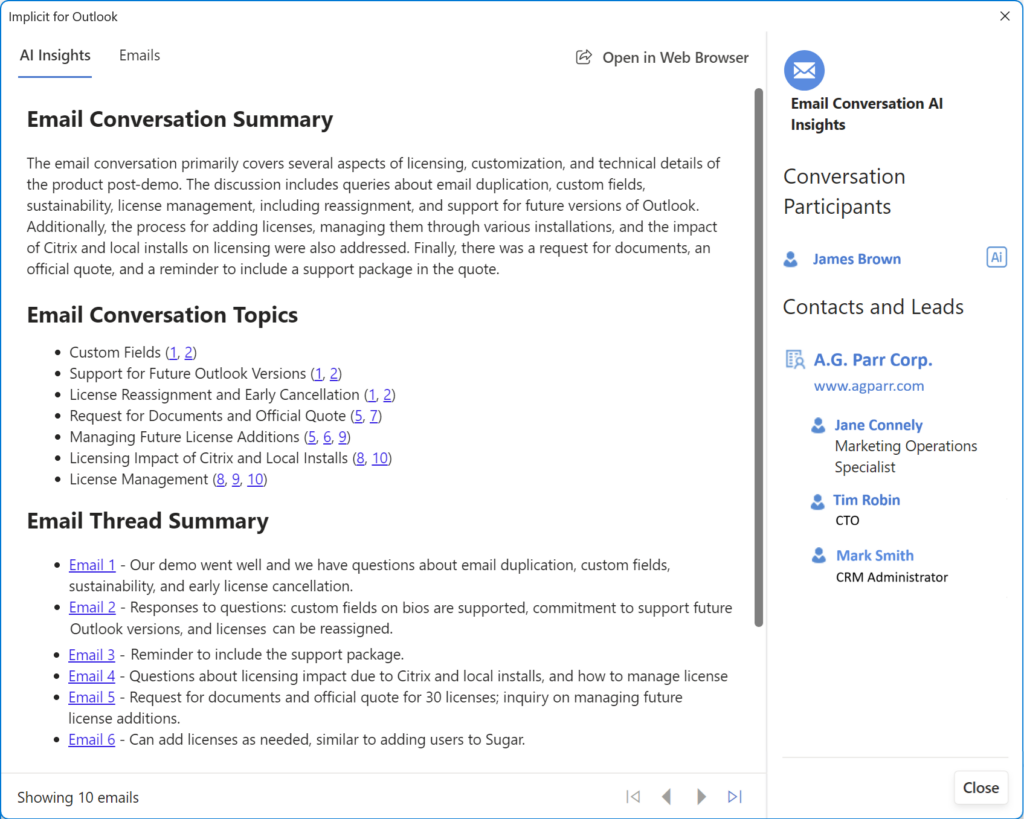 The Email AI Insight includes two tabs:
AI Insights Tab:
- Email Conversation Summary – A one-paragraph summary of the complete email conversation.
- List of key topics that were discussed. Each topic contains a list of references with email numbers. Clicking the email reference takes you to the original email where that topic was discussed.
- Email Thread Summary – A short one-sentence summary of each email
- Contact and Leads – Conversation participants who are already defined in the CRM as contacts or leads, organized by accounts or companies.
- Other Conversation Participants – A list of other email senders who are not currently defined in the CRM (their email addresses were not found). Those participants for whom AI is able to identify an email signature, show up with an AI button next to them which allows you to extract their contact information and generate a contact or a lead record directly in the CRM.
Emails Tab:
A sequential list of emails that were included in the conversation. This is extremely useful if you are looking for emails where a certain topic was discussed. For example, if you are looking for emails where you discussed pricing with a customer, clicking on any of the reference email numbers next to the topic will take you directly to that email.
Meetings AI Insights
Meeting AI Insights enables you to:
- Review AI insights of your customer meetings including meeting sections, key topics, discussion points and follow up action items related to accounts, opportunities, quote etc.
- Review meeting sections and topics. By breaking down the discussion into sections and presenting a summary view of each section topic and discussion, Implicit allows you to review the meeting notes at a glance, and come up to speed on what was discussed, by whom and what action items should be taken.
- Save in CRM and share with your colleagues and supervisors. Meetings AI insights are saved in the CRM and can be shared with other users, so user who have not attended the meeting can quickly and effectively review what was discussed and what actions items should be followed up on.
- Leverage CRM information as context from the meeting. By leveraging the history of the account from the CRM as context for the meeting, Implicit ensures high quality AI analysis.
- Review list of action items and generate follow up tasks in CRM.
- Meetings AI Insights include the following:
- Minutes of Meeting / Overview
- List of key discussion topics
- A short summary of each of the topics that were discussed
- A list of follow up tasks that can be converted into CRM tasks
Selecting Meetings to generate AI Insights
The process starts when you send a meeting invite from Outlook and select a Teams meeting. By clicking the “Implicit for Outlook” button on the meeting invite compose window, the meeting side panel is displayed:
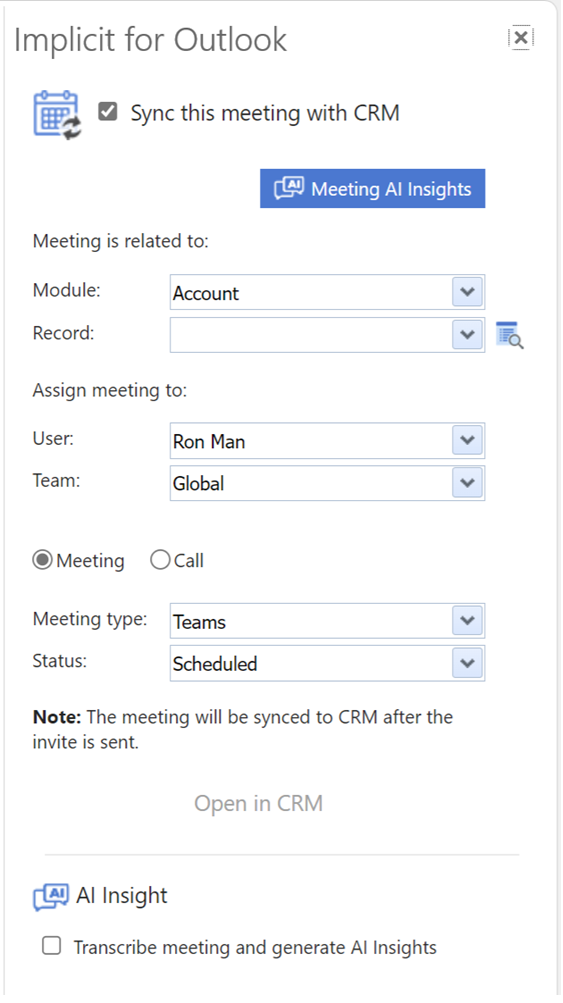 The meeting side panel allows you to select the following:
- By default, ‘Sync’ this meeting with CRM’ is selected
- You can choose the module and the record that this meeting should be related to. You can also leave it empty, in which case the meeting will be synced and would show up in your CRM calendar, but it would not be related to any CRM record.
- Select the user (by default – yourself as organizer) and the Team or security group that the meeting would be assigned to.
- Meeting Type – This list of meeting types is dynamically brought from the CRM and allows you to specify the same types in Outlook.
- Status – Same as in CRM.
- ‘Transcribe and Generate AI Insights’ – will be off by default if you chose to manually select meetings to transcribe and generate AI insights, or on if you selected the automatic mode. Please see: AI Insights settings
Tracking Online Meetings and Generating AI Insights
After the meeting has been marked for AI Insights, Implicit continues to track the meetings until it detects that the meeting was held and the transcripts were ready. It retrieves the transcripts from Microsoft Teams and runs them through OpenAI to generate the summary and the AI insights. It then saves the AI insights as a note attached to the meetings record in the CRM. If you have configured Implicit AI Insights to prompt you to manually select whether a meeting should be transcribed and processed by AI, you will be prompted to do so by the following dialog:
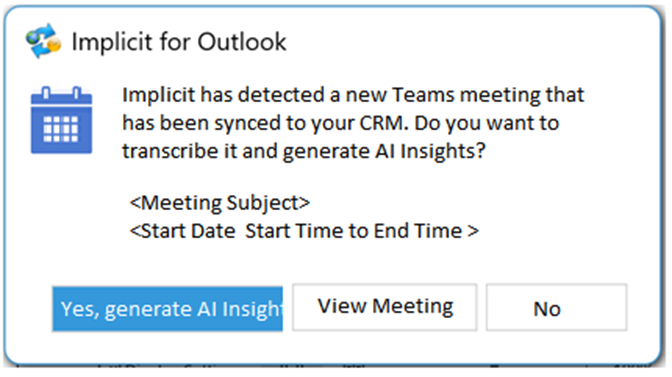
If you have configured Implicit AI Insights to automatically transcribe and generate AI insights for all meetings with CRM contacts or leads, you will not be promoted, and such meetings will be automatically processed.
Searching / Viewing Meetings AI Insights
To view the AI insights, click the ‘AI Search’ button on the side-panel and select ‘Search Meetings’. Implicit for Outlook will present a list of meetings that are related to the CRM module and record that you select. You may also search for meetings based on the subject of the meeting, its status, start and end date and the assigned user.
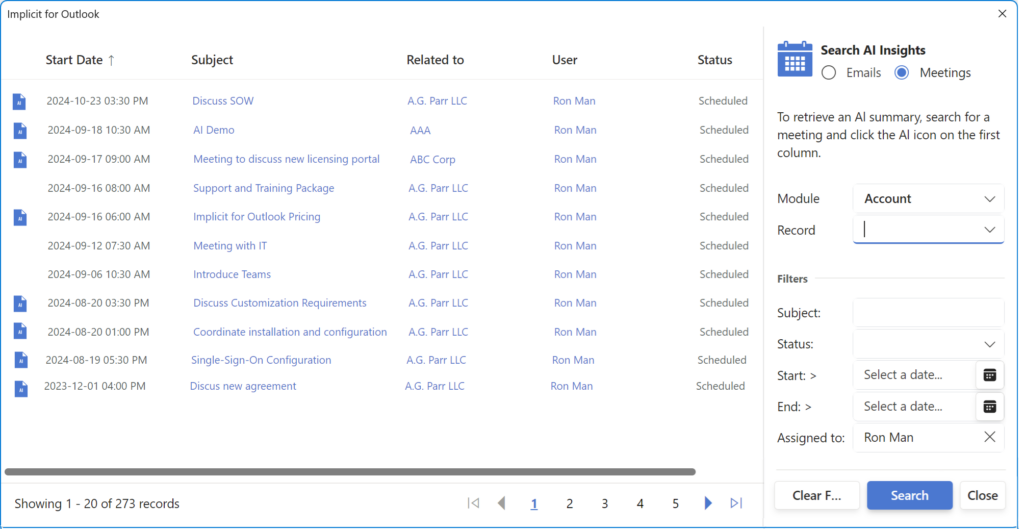
Set the search filters to match your search. By default, it will select the account related to the email selected in Outlook if the contact and account is known in the CRM. Meetings that contain AI Insights will be displayed with a blue AI icon on the first left-hand column. Click the AI icon to open the meeting AI insights.
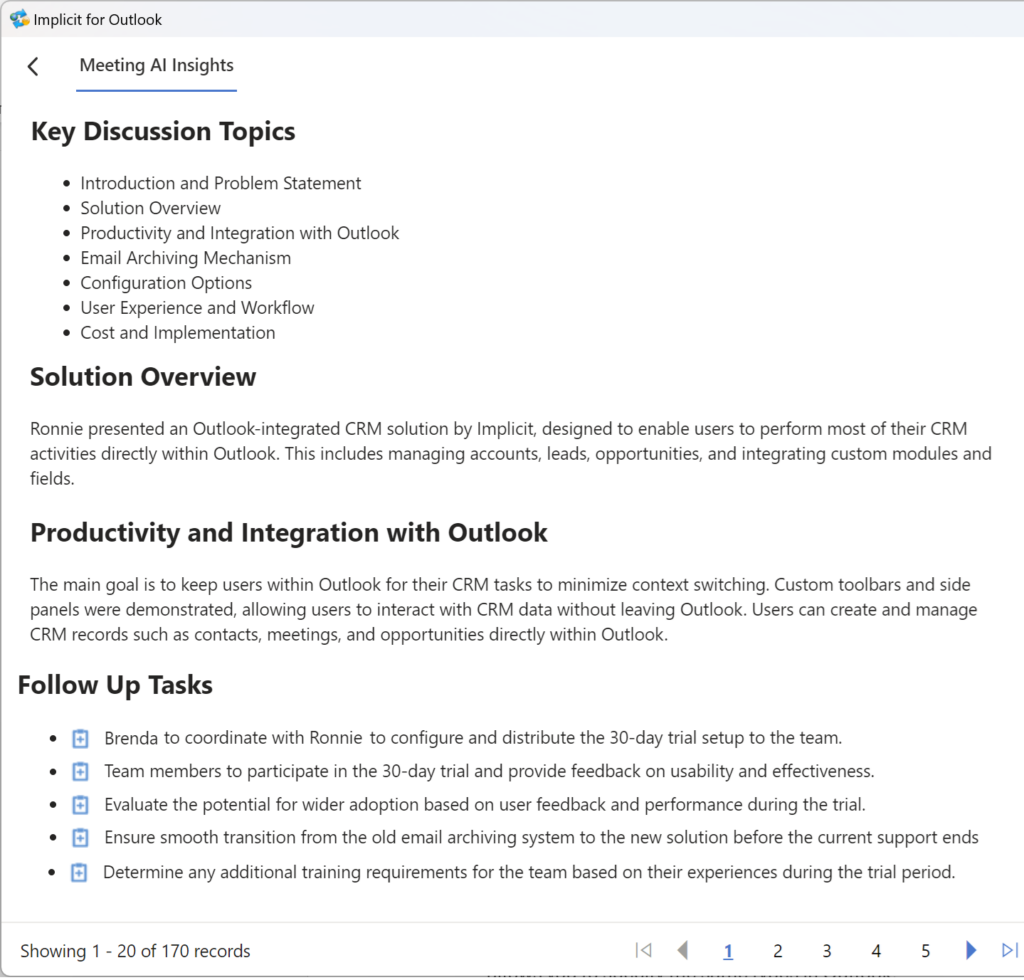 As you can see from the above screenshot, the meeting AI Insight includes the following:
- Minutes of Meeting / Overview
- List of key discussion topics
- A short summary of each of the topics that were discussed
- A list of follow up tasks that can be converted into CRM tasks
Follow Up Tasks
To convert any of the follow up tasks to an actual CRM task, click the corresponding icon. Implicit will generate a new task, populate it with the content that AI generated and allow you to edit the new task before saving it to the CRM.
Viewing all Meetings AI Insights for an Account
To view all AI insights for Outlook conversations related to the selected account, click the ‘AI Search’ button on the side-panel.
Implicit for Outlook will present a list of Meetings AI Insights related to the account you selected.
Contacts / Leads AI Insights
When you receive an email from an unknown prospect who does not have a CRM record, you will be prompted with the following screen to create an account, contact or a lead record.
Click the AI insight button, to extract the account and contact information from the email and present the information about the contact and the account in the side panel. You can then create CRM records prepopulated with this information.